
Integration API
connect the systems your crews already use
How to issue API keys, let another system send records in and take records out, and get notified the moment something happens.
Short answer
The ShieldSphere Integration API lets another system read your safety data and send records in over HTTPS. An organization owner issues a scoped API key in Settings, hands it to whoever builds the integration, and that system can then pull employees, incidents, assets, chemicals, inspections, training and hazard scans on a schedule, push new records and photos for AI analysis, and receive a webhook when something happens.
1What the Integration API does
One key, one set of endpoints, and the systems your company already runs can talk to ShieldSphere without anyone retyping data.
Most safety data starts life somewhere else. Your roster lives in a payroll system, your equipment in a maintenance platform, your field observations in whatever your superintendents carry. The Integration API is how those systems and ShieldSphere stay in step without a person in the middle copying records across.
Read your data
Locations, employees, OSHA incidents, assets, chemical inventory, inspections, training records and hazard scan results - queried on demand or synced on a schedule.
Send records in
Create employees, incidents, assets, chemicals, inspections and completed training sessions, or submit a hazard photo and get an OSHA analysis back.
An outside system can add records and read them back. It can never change or remove anything. Corrections happen in ShieldSphere, where the audit trail lives, so there is never a question about which system holds the truth. A compliance record that an integration could quietly rewrite is not much of a record.
The Integration API is part of the Enterprise plan. If you do not see a Developers section in Settings, it is not switched on for your organization yet - contact ShieldSphere and we will enable it.
Everything in this guide is done by an organization owner. Issuing a key grants standing access to your compliance data, so it is deliberately restricted to the single owner account rather than to every administrator.
2Words you'll see
Nine terms cover everything in this guide. Skim them once and the rest reads easily.
| Term | What it means |
|---|---|
| API key | The secret string an outside system sends to prove it is allowed to talk to your ShieldSphere data. You see it once, when you create it. |
| Permission | One thing a key may do, such as "Read incidents" or "Create employees". A key carries only the permissions you tick. |
| Location scope | An optional restriction to one site. A scoped key cannot see any other location's records, no matter what it asks for. |
| Endpoint | One address the other system calls, such as /api/v1/incidents. |
| Idempotency key | A label the other system attaches to a write so that retrying it cannot create the record twice. |
| Job | Work that takes longer than a single request - hazard photo analysis. You get a job id immediately and check back for the result. |
| Webhook | A URL of yours that ShieldSphere calls when something happens, so the other system does not have to keep asking. |
| Signing secret | The secret used to prove a webhook really came from ShieldSphere and was not forged. |
| Request id | An identifier on every response. Quote it to support and we can find the exact request in our logs. |
3Issuing an API keyAdmin
Decide what the key may do and which sites it may see, then hand the secret to whoever is building the integration.
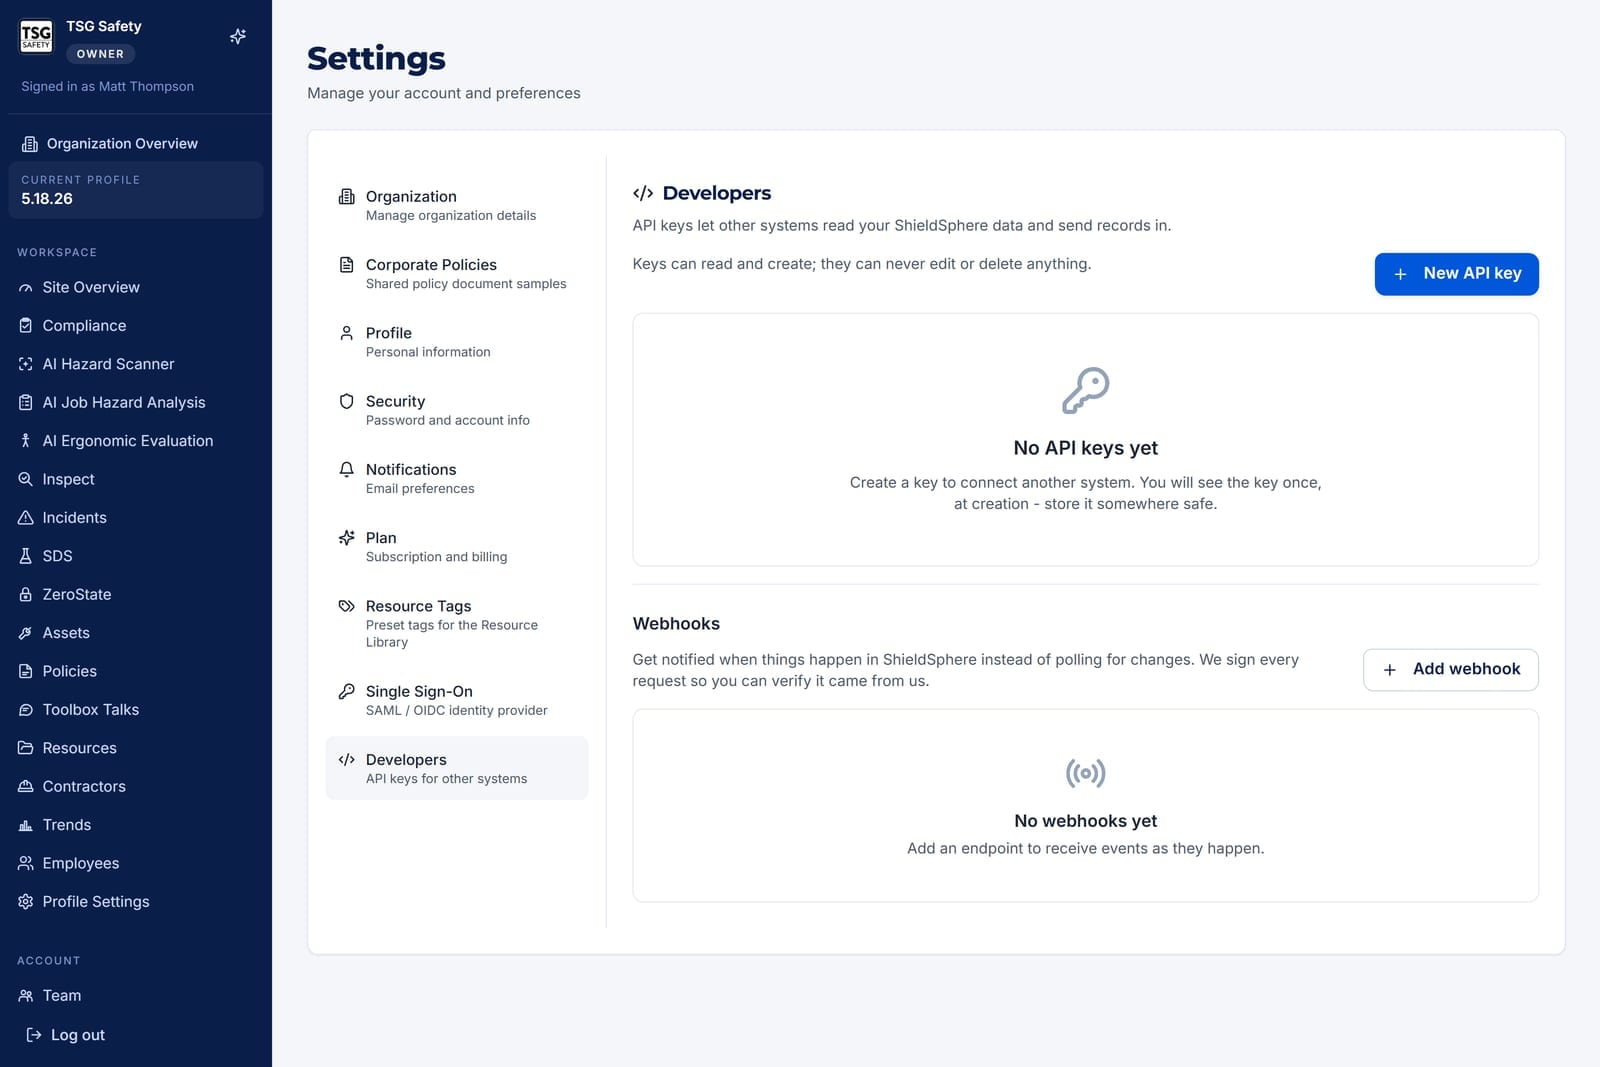
Open the Developers section
Go to Settings and choose Developers in the left-hand list. If it is not there, either the API is not enabled for your organization or you are signed in as an administrator rather than the owner.
Name the key for where it will live
Click New API key. Name it after the system that will use it - "Procore sync", "Payroll nightly import" - not after a person. Keys outlive the people who set them up, and in six months the name is all you will have to go on.
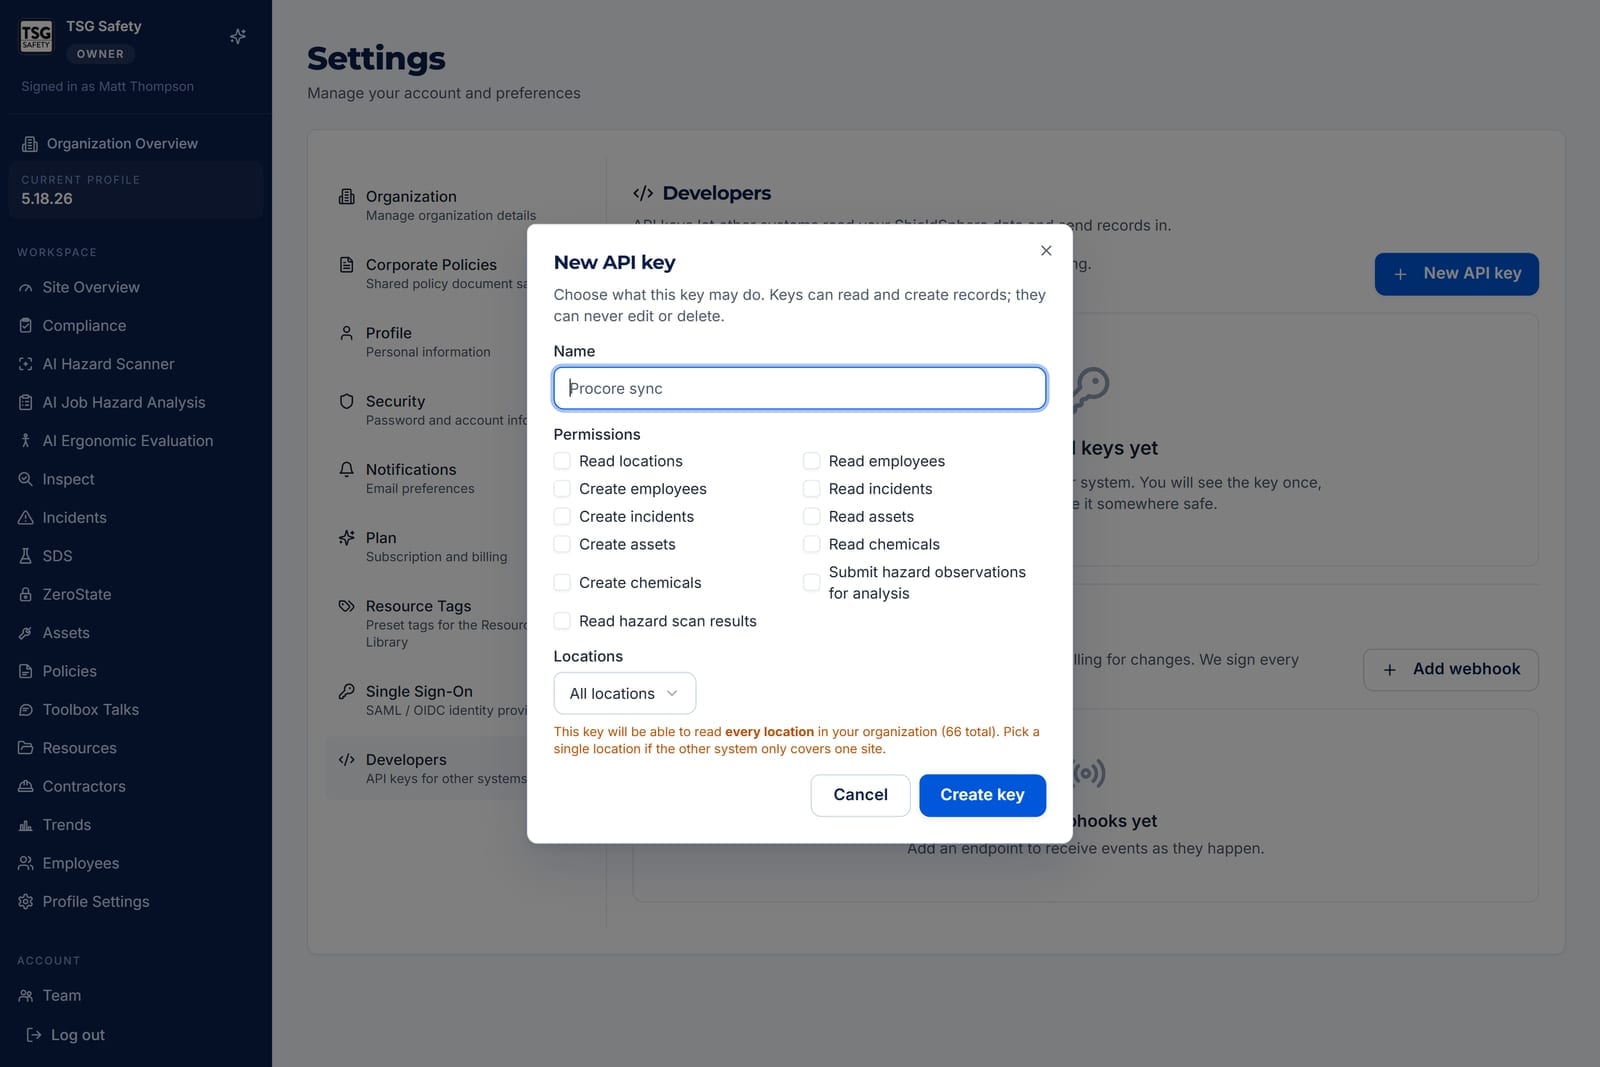
Tick only the permissions that system needs
Each permission is one capability. A dashboard that only displays incident counts needs Read incidents and nothing else. Grant the smallest set that does the job - you can always issue a second key later, and a narrow key limits the damage if it ever leaks.
Restrict it to one location when you can
If the other system only covers one site, pick that site in Locations. The key then cannot read anything from your other locations even if it asks. Leave it on All locations only when the integration genuinely spans the whole organization.
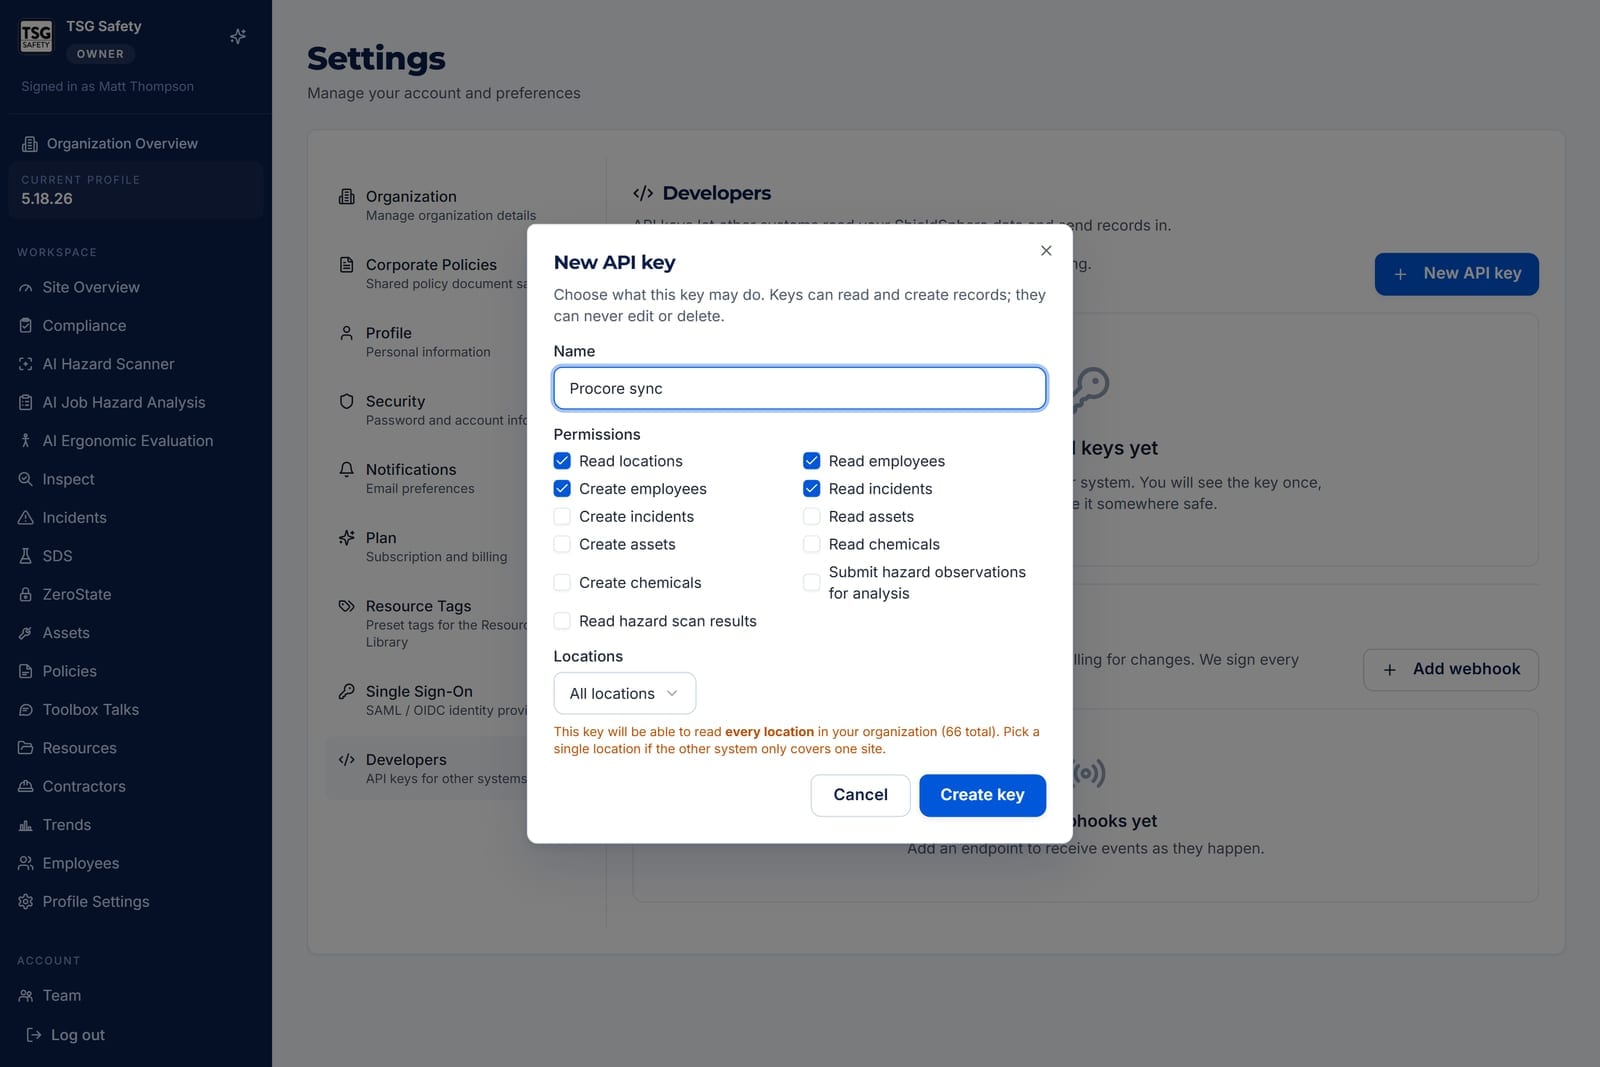
Copy the key before you close the dialog
Click Create key. The full key appears once. Copy it straight into the other system's configuration, or into your password manager. Closing the dialog is the last time that value exists anywhere outside the system you paste it into.
ShieldSphere stores only a one-way fingerprint of the key, so we genuinely cannot show it to you again or recover it. If it is lost, revoke that key and issue a new one - see section 9.
Treat it like a password: use your password manager's sharing feature, not email or chat. Anyone holding the key can read whatever it permits, from anywhere.
After creation the list shows each key by name, along with the first few characters of the secret so you can tell several keys apart, its permissions, whether it is limited to a location, and when it was last used. A key that has never been used is worth chasing - it usually means the integration was never finished.
4Reading your data
What the other system can pull, and the one thing to tell whoever builds it.
This section is for the person writing the integration. These collections are available, each returning JSON:
| Endpoint | Returns |
|---|---|
| /api/v1/profiles | Your locations. Fetch these first - most other calls need a location id. |
| /api/v1/employees | The roster. Active employees by default. |
| /api/v1/incidents | OSHA recordable incidents. |
| /api/v1/assets | Equipment and its inspection status. |
| /api/v1/chemicals | Chemical inventory by location. |
| /api/v1/scans | Hazard scan results, with findings on the single-scan endpoint. |
| /api/v1/inspections | Inspections, with their findings on the single-inspection endpoint. Finalized and archived inspections by default; drafts only when asked for. |
| /api/v1/training-records | Who completed which training, when, and when it expires. Expired records are included, because they are what a coverage check most needs to see. |
| /api/v1/training-sessions | Completed training sessions with attendee counts. Sessions still in progress are not listed. |
The key travels in a header on every request:
Results come back in pages, oldest first, with a cursor for the next page. Passing updated_since with the timestamp of the last run returns only what has changed, which is what makes a nightly sync cheap.
Some data is withheld from the API by design, regardless of permissions: the medical detail on an OSHA 301 form (home address, date of birth, treating physician), deleted records, and incidents still awaiting a safety manager's review. Privacy-case incidents return with the employee name replaced by "Privacy Case", as OSHA requires.
Endpoint-by-endpoint documentation, request and response shapes, and a machine-readable OpenAPI file live at shieldspheresafety.com/developers. Point your developer there rather than transcribing details out of this guide.
5Sending records in
Outside systems can create employees, incidents, assets, chemicals, inspections and completed training sessions - and one habit prevents the only serious mistake available here.
Creating a record is a POST to the same address you would read it from. The response carries the new record's id, and for incidents also its OSHA case number.
Networks drop responses. If a write appears to fail and the other system retries it, an idempotency key is what stops a second record being created. This matters most for incidents: OSHA case numbers run in sequence, so a duplicate consumes a number that cannot be reclaimed, and deleting the extra record leaves a permanent gap in your 300 log.
Incidents accept partial information. OSHA allows seven days to complete a 301 form, so the other system can send what it has - location, date, description, employee name and classification - and someone finishes the record in ShieldSphere later.
If an incoming employee matches one already on your roster by email, the request is refused rather than silently merged. The other system reports the conflict and someone decides - the same rule the bulk spreadsheet upload follows.
6Hazard photos from the field
Send a photo of a work area and get the same OSHA analysis the AI Hazard Scanner produces in the app.
This is the capability most worth building an integration around. If your crews already record observations with photos somewhere else, that system can hand each photo to ShieldSphere and receive back a list of likely hazards with OSHA citations and corrective actions - without anyone re-uploading anything.
Analysis takes longer than a web request should wait, so it works in two steps. The other system submits the photo and immediately receives a job id. A few moments later it asks for that job and gets the findings, along with a scan id so the result also appears in your ShieldSphere scan history like any other scan.
If the other system sends its own record identifier along with the photo, resubmitting the same observation returns the original analysis instead of running a second one. Worth setting up: each analysis is real work, and this stops a retry loop from repeating it.
The analysis is AI-generated. Treat it as a trained observer's opening assessment - a prompt for someone to look, not a compliance determination. Every finding carries a confidence level.
7Sending records out
ShieldSphere does not push whole records into another system. The other system collects them, either on a schedule or the moment a webhook tells it something new is waiting.
Getting records out of ShieldSphere and into a payroll platform, an insurer's portal or your own data warehouse always works the same way: the other system asks for them. There are two ways to know when to ask, and most integrations that need everything use both.
Scheduled sync
The other system reads each collection it needs every night, or every hour, and asks only for what changed since the last run. Covers every record, wherever it was created.
Webhook, then fetch
ShieldSphere calls the other system the moment a record is added, and it fetches the full record straight away. Covers records created in ShieldSphere and through the API, when the endpoint is set to include both.
Each webhook endpoint has this setting. When it is on, the endpoint hears about records people add in ShieldSphere - an incident logged in the dashboard, an inspection finished on a phone, a bulk employee upload - as well as records sent in through the API. When it is off, the endpoint hears only about records that came in through the API, and a webhook alone will miss most of your data. It is on for new endpoints. See section 8.
Webhooks give the other system new records within minutes. A nightly sync catches anything a webhook could not deliver - for example if the other system was down for longer than ShieldSphere keeps retrying - and picks up edits, which webhooks do not announce.
Setting up a scheduled sync
This part is for the person writing the integration.
Issue a read-only key
Tick only the Read permissions for the collections being sent out - see section 3. A key that only takes records out has no reason to be able to create them.
Note the time, then read every page
At the start of each run, the other system notes the current time. It then reads each collection with updated_since set to the start time of its last successful run, following the cursor until there are no more pages. The first run leaves updated_since out and collects everything.
Match on id, and update rather than add
A record edited in ShieldSphere after it was sent comes back in the next run. The other system should look up each record by its ShieldSphere id and update its copy, not create a second one.
Save the start time only when the run finishes
If a run fails partway through, keep the previous start time so the next run picks up everything the failed one missed. Saving the time too early is the usual reason a sync silently skips records.
Incidents submitted through the employee portal or incident chat are not sent out until a safety manager approves them. Draft inspections are left out unless the other system asks for them, and training sessions appear only once they are closed. The same withheld details listed in section 4 never go out at all.
Using a webhook to know when to look
A webhook is a short notice, not the full record. It names the event, says where the record came from, and carries the record's id, its location and a few summary fields - an incident's case number and date, an inspection's finding count, a scan's risk level. Privacy-case incidents name the employee as "Privacy Case" in the webhook too, and near-miss notices carry no names at all.
The other system then reads the whole record. It needs two things from you, both issued in Settings → Developers:
The signing secret
Proves each webhook really came from ShieldSphere. Issued when you add the webhook - see section 8.
An API key with Read permissions
Lets it fetch the full record the webhook points to. Issued as in section 3.
Check the signature and reply straight away
The other system confirms the signature with the signing secret, then answers ShieldSphere with a success response at once. The slow work comes after, so ShieldSphere is never kept waiting.
Fetch the record by its id
It reads the record from the address that matches the event, using its API key:
| Event | Read the record from |
|---|---|
| Hazard scan completed | /api/v1/scans/{scan_id} - every finding, with citations and corrective actions |
| Inspection recorded | /api/v1/inspections/{inspection_id} - with its findings |
| Incident recorded, Near miss reported | /api/v1/incidents/{incident_id} |
| Employee added | /api/v1/employees/{employee_id} |
| Asset added | /api/v1/assets/{asset_id} |
| Chemical added | /api/v1/chemicals/{chemical_id} |
A webhook can announce a record the key is not allowed to see - a key without Read incidents, or one limited to a different location. That fetch comes back "not found", exactly as if the record did not exist. Give the key the Read permissions for every event you send, and the same locations.
These are the events you can send:
| Event | Sent when |
|---|---|
| Hazard scan completed | A hazard scan finishes - in the app, on mobile, from a contractor, or a photo sent through the API. |
| Hazard scan failed | The analysis of a scan fails. Problems with an upload or a save, which ShieldSphere has to fix, are not sent. |
| Incident recorded | A recordable incident is logged, or one reported through the employee portal or incident chat is approved. |
| Near miss reported | A near miss is reported, including anonymous reports from a QR code. |
| Employee added | An employee is added, one at a time or in a bulk upload. |
| Asset added | An asset is added, one at a time or in a bulk upload. |
| Chemical added | A chemical is added to an inventory, including from a chemical list import. |
| Inspection recorded | An inspection is finalized. Drafts are not sent. |
Section 8 covers setting a webhook up.
8WebhooksAdmin
Instead of another system asking "anything new?" every few minutes, ShieldSphere tells it the moment something happens.
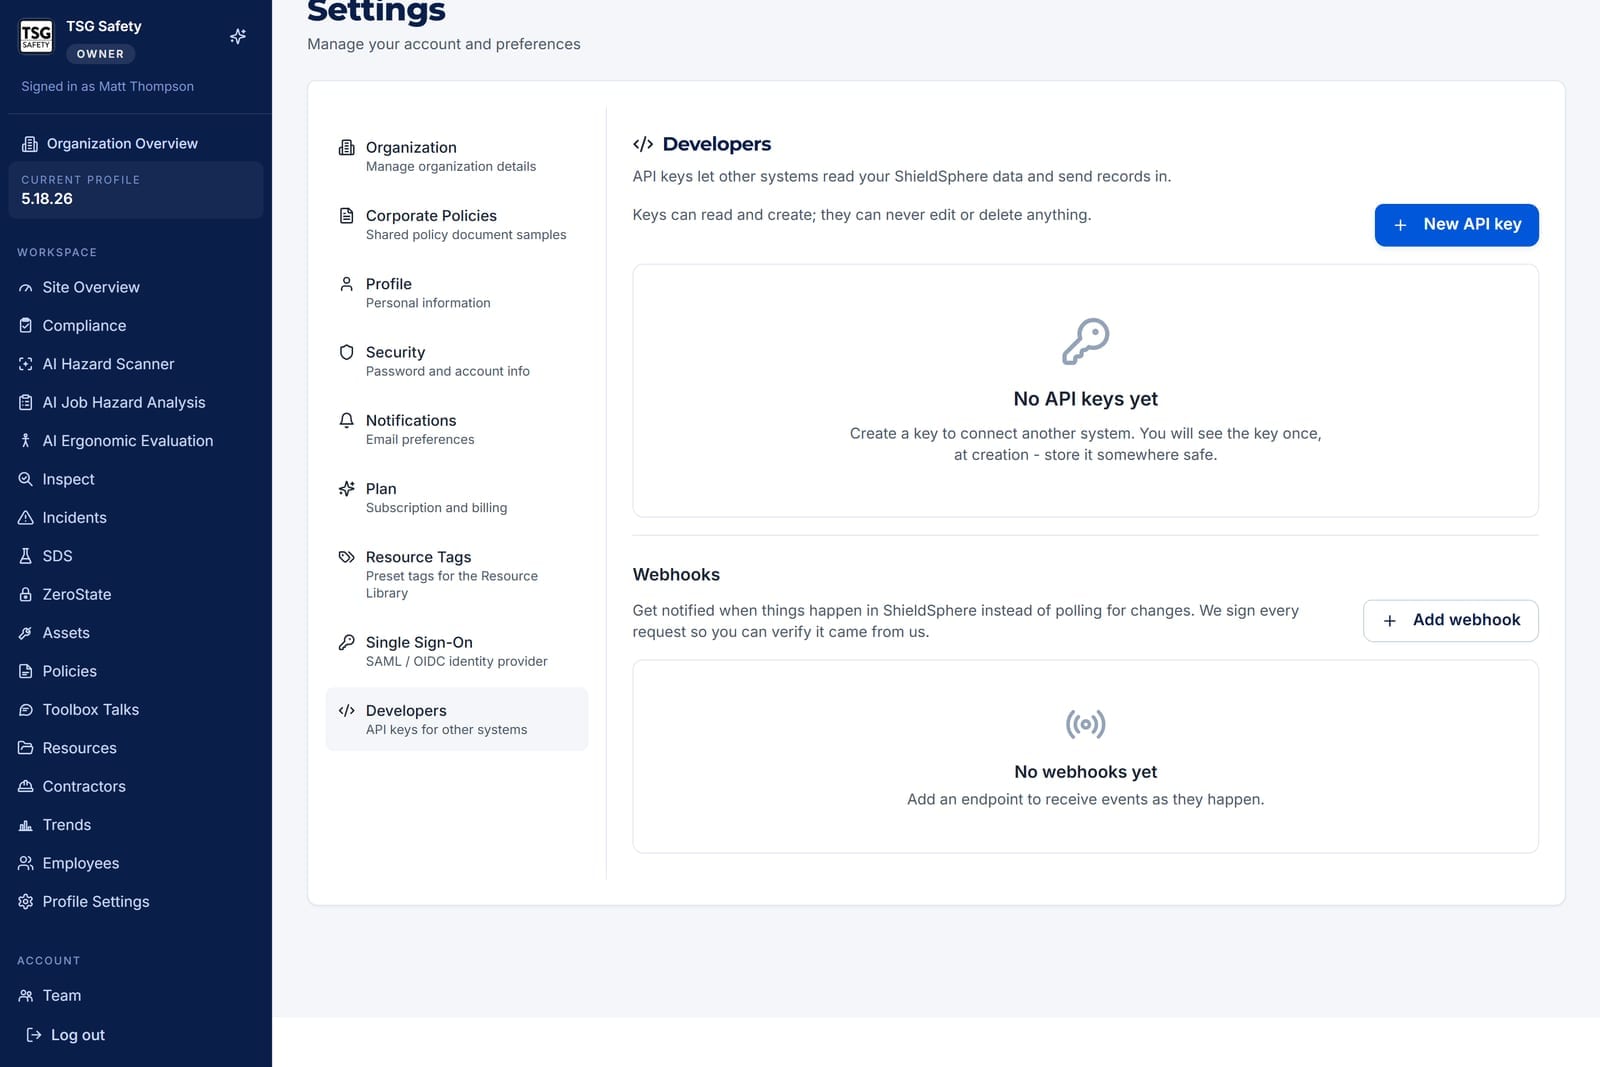
Get a URL from whoever built the integration
They need to give you an address that accepts an HTTPS POST. It has to be reachable from the public internet - a URL inside your own network will not work, because ShieldSphere is calling in from outside.
Choose which events to send
Click Add webhook, paste the URL, and tick the events that system cares about. Send only what it will act on; every event you add is another request it has to handle. Leave Include records created in ShieldSphere ticked so the other system hears about records people add in the app, not only ones sent in through the API. Section 7 lists each event.
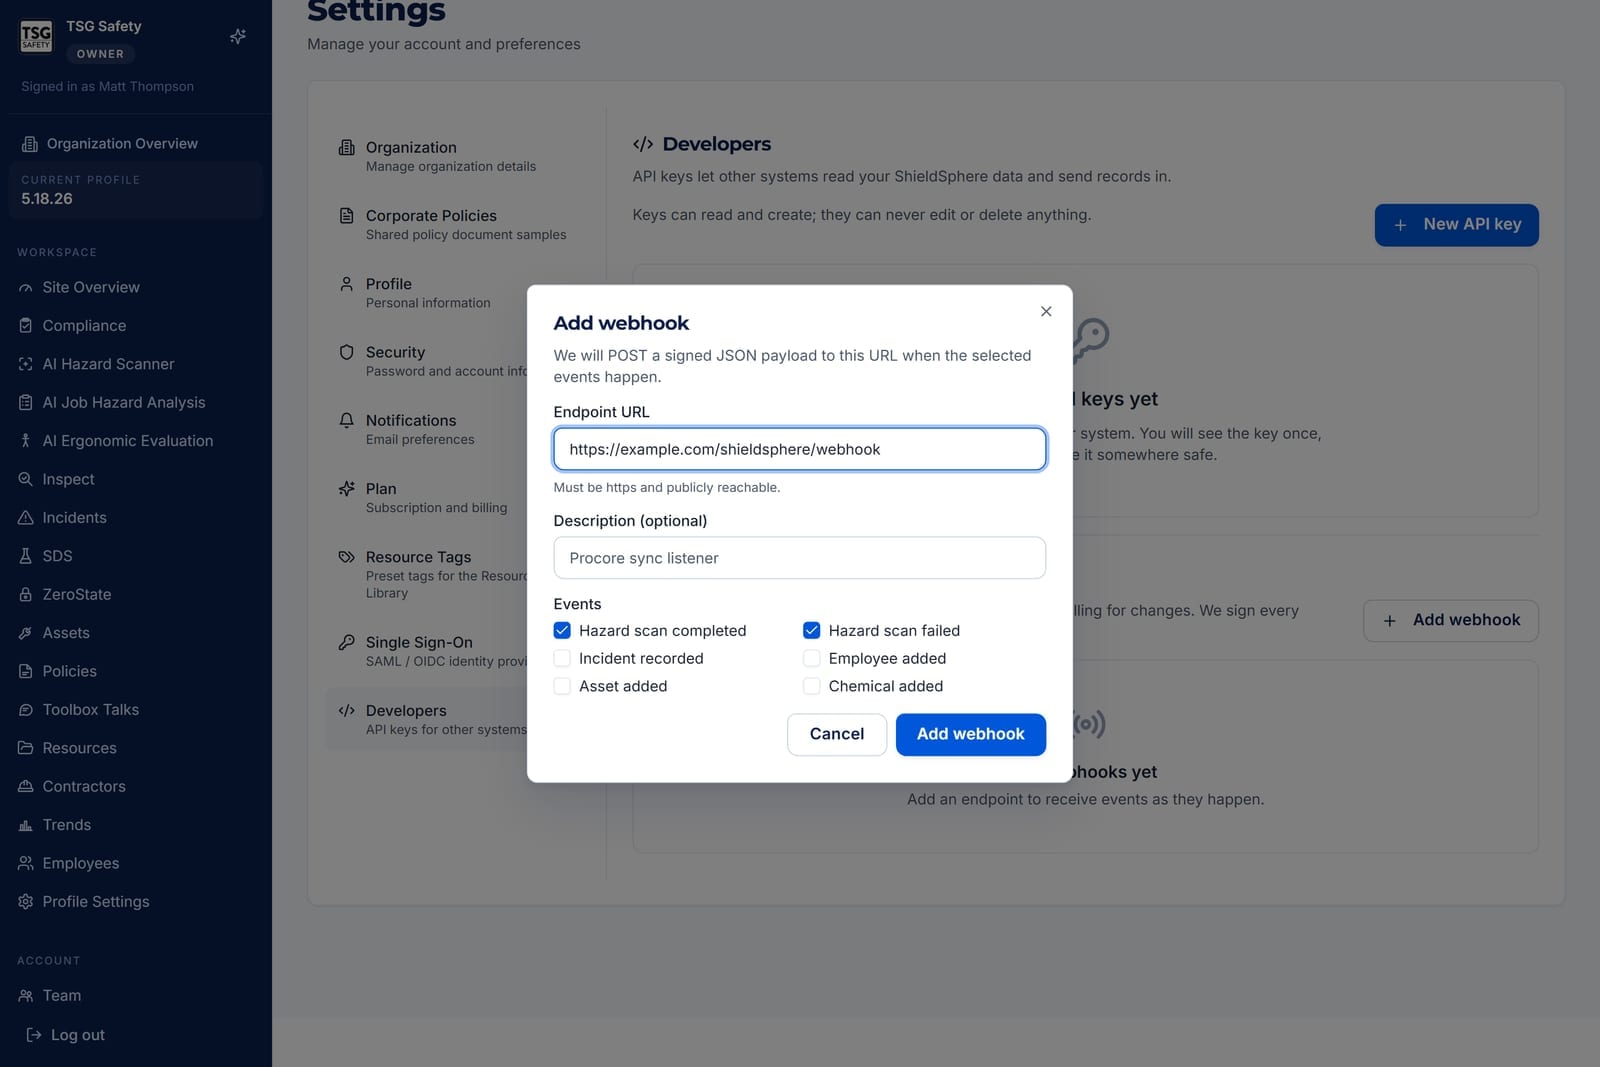
Pass the signing secret to your developer
When you save, a signing secret appears once - the same rule as an API key. Their code uses it to confirm each incoming request genuinely came from ShieldSphere. Without that check, anyone who learns the URL could send fake events.
Send a test event
Click Send test on the endpoint's row. ShieldSphere sends a sample event right away, signed with the real secret, and shows the status and response their server returned. The test is marked as a test in its body and appears in the delivery log like any other event. Do this before relying on the endpoint - otherwise the first real event is the test.
If deliveries keep failing, ShieldSphere retries with growing gaps and eventually pauses the endpoint, so one broken URL cannot hold up everything else. The panel shows why it paused and offers Resume once it is fixed. Resuming keeps the same secret - no need to reconfigure anything.
Every endpoint has a Deliveries view listing recent attempts with the response your server returned. When someone reports a missing event, look there before anything else - it usually shows either the event never matched, or their server returned an error.
9Revoking and rotating keysAdmin
Turning a key off takes effect on the very next request. Do it without hesitating.
Revoke a key whenever it may have been exposed: a developer leaves, a laptop goes missing, a secret gets pasted into a chat or a support ticket. Revoking is instant and free. Leaving a questionable key alive is the expensive choice.
Revoke it
In the key list, click the revoke icon on that row and confirm. Any system using it stops working immediately.
Issue a replacement and update the other system
Create a new key with the same permissions and location scope, then paste it into the integration's configuration. There is no way to un-revoke, and no way to recover the old value.
The system holding that key stops working the moment you confirm. If it is doing something you rely on, have the replacement ready before you revoke - or accept a short gap.
Disabling the Integration API for your organization kills every key at once, immediately. It is the fastest way to shut off all outside access if you need to.
Revoked keys stay in the record rather than disappearing, so the history of what was issued and used survives. That is the same reasoning behind archiving rather than deleting documents in the Resource Library.
10Troubleshooting
What the symptom usually means, and what to do about it.
| Symptom | Cause and fix |
|---|---|
| No Developers section in Settings | Either the Integration API is not enabled for your organization, or you are signed in as an administrator rather than the owner. Only the owner can issue keys. Contact ShieldSphere to have it enabled. |
| The other system reports "Invalid or expired API key" | One of four things: the key was mistyped, it was revoked, it passed its expiry date, or the Integration API was switched off for your organization. All four return the same message on purpose, so an attacker cannot learn which. Check the key list first - if the key is not there, it was revoked. |
| "This API key does not have the ... scope" | The key is valid but was not given that permission. Issue a new key with the right permissions ticked; permissions cannot be added to an existing key. |
| A location's records come back empty | The key is probably scoped to a different location. Check the Locations column in the key list. A scoped key sees exactly one site. |
| Two records were created instead of one | The other system retried a write without an idempotency key. Add one - see section 5. On an incident this also consumes an OSHA case number, so tell whoever maintains your 300 log. |
| Photo submission is refused | The photo URL must be HTTPS, publicly reachable, under 20MB, and must return the image directly. A link that redirects elsewhere is rejected, because a redirect can point somewhere the original link did not. Pre-signed storage URLs often redirect - resolve them first. |
| Hazard analysis never finishes | Check the job's status. "Dead" means it failed permanently and the reason is included - usually an unreadable photo or a location that could not be resolved. Resubmit after fixing the cause. |
| A webhook endpoint shows as paused | Deliveries failed repeatedly and it paused automatically. The panel names the last failure. Fix the endpoint, then click Resume - the secret does not change. |
| Webhooks are not arriving at all | Open the endpoint's Deliveries view. No entries means no matching event occurred, so check which events are ticked. Entries with error responses mean the events were sent and your server rejected them. |
| Records created in ShieldSphere never reach the other system | The webhook endpoint has Include records created in ShieldSphere switched off, so it hears only about records sent in through the API. Switch it on in the endpoint's row under Settings → Developers - see section 7. |
| A webhook arrives but fetching the record says "not found" | The API key cannot see that record: it lacks the Read permission for that kind of record, or it is limited to a different location. Issue a key with the right permissions and locations - see section 7. |
| A scheduled sync misses some records | Usually the sync saved its start time before the run finished, or it was saved from the end of the run instead of the start. See section 7, steps 2 and 4. Portal and chat incidents also stay out until a safety manager approves them. |
| Requests start returning "Rate limit exceeded" | The key exceeded its per-minute allowance. Reads and writes are counted separately. The response says how long to wait; a well-behaved integration backs off and retries. |
Every API response carries a request id. Include it and we can find the exact request in our logs rather than guessing from a description.
Try Integration API in ShieldSphere
Start a free hazard scan and see the platform these guides describe - no credit card required.
Screens captured from the live application in August 2026 using a demonstration site - your screens will show your own data. Because ShieldSphere ships changes regularly, check the version above against the current release before circulating this guide widely. Questions? Contact support.