
Inspect
from walkthrough to closed-out finding
How to run photo and checklist inspections, review AI findings, and drive corrective actions to completion.
Short answer
ShieldSphere's Inspect module turns a workplace walkthrough into a documented, defensible record. Capture what you saw as photos or checklist answers, and findings are produced against specific OSHA standards. Finalizing locks the record, corrective actions are raised from the findings and assigned to people, and trends roll everything up so you can see what keeps coming back.
1What Inspect does
Inspect is where a walkthrough of your workplace becomes a documented, defensible record - and then becomes work that actually gets done.
Every inspection in ShieldSphere follows the same arc, whether you photographed a shop floor or worked down a printed-style checklist:
- Capture what you saw - photos, or answers to checklist questions.
- Findings are produced, each tied to a specific OSHA standard.
- Finalize the inspection, which locks the record.
- Corrective actions are raised from the findings and assigned to people.
- Trends roll everything up so you can see what keeps coming back.
That last step is the reason the first four matter. An inspection that ends at "we wrote it down" doesn't reduce risk. Inspect is built so the handoff from finding to fix happens in the same place, without a spreadsheet in the middle.
Photo inspection
Upload site photos and let the AI surface OSHA findings for you. Fastest way to cover a lot of ground.
Checklist inspection
Work through a published checklist, answering each item pass / fail / N/A with notes and photos. Repeatable and auditable.
Inspect is a site-level module. Everything you do in it belongs to the site (profile) currently selected in the left sidebar. Switch sites and you'll see a different set of inspections. Checklist templates, by contrast, can be shared across every site in the organization.
2Words you'll see
| Term | What it means |
|---|---|
| Site / profile | One physical location or client company. The site name shows under Current profile in the sidebar. |
| Inspection | One walkthrough on one date. Either a photo inspection or a checklist inspection. |
| Finding | A single problem observed, with a severity, an OSHA citation, and a suggested fix. |
| Draft | An inspection still being edited. You can add images, edit findings, and change details. |
| Finalized | A completed inspection. The record is locked and cannot be edited further. |
| Corrective action | The assigned task that fixes a finding. Has an owner, a due date, and evidence photos. |
| Checklist template | A reusable set of inspection questions. Must be published before anyone can run it. |
| Location preset | A saved label like "Maintenance Shop, Cabinet A" used to tag where a photo was taken. |
3The Inspect home screen
Click Inspect in the left sidebar. You land on the module home for whichever site is currently selected.
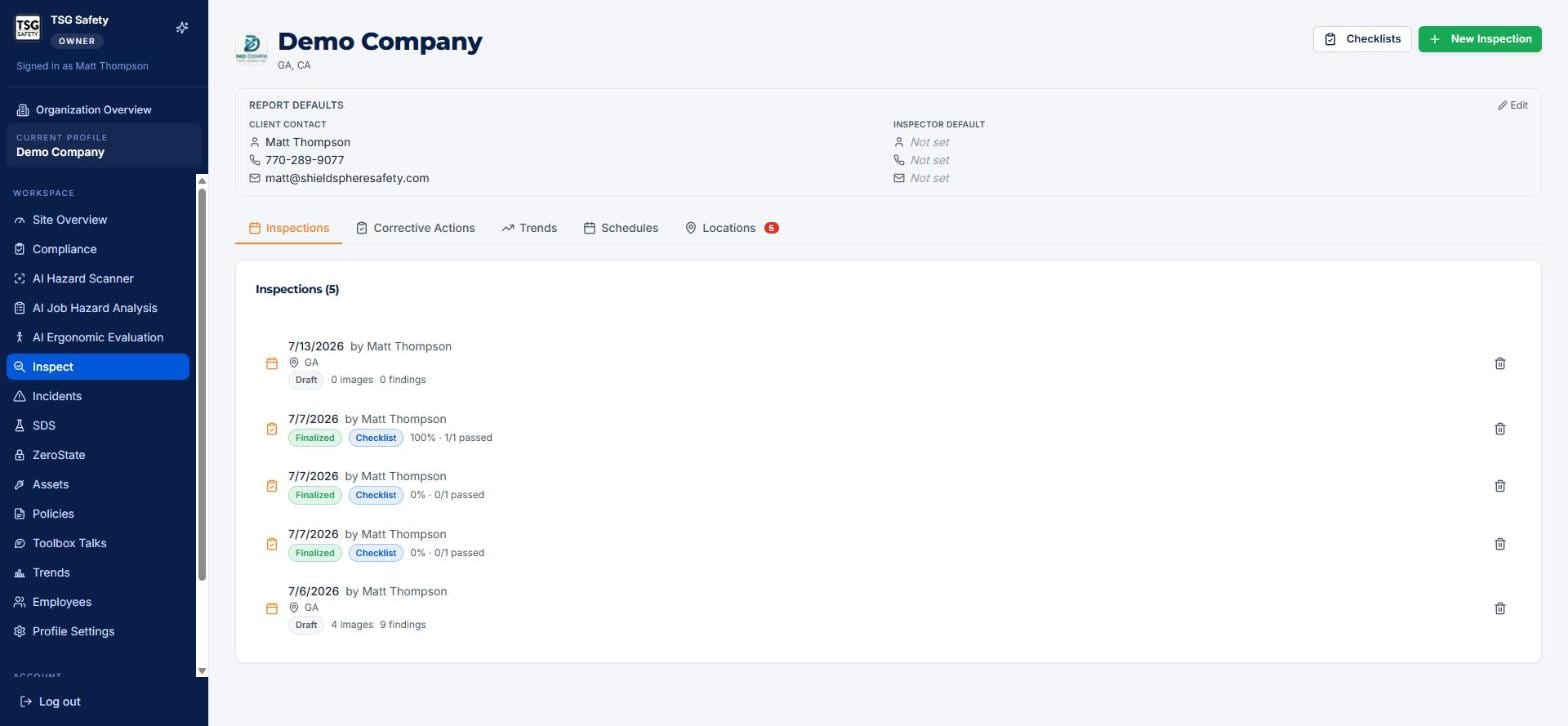
The five tabs
| Tab | What lives there |
|---|---|
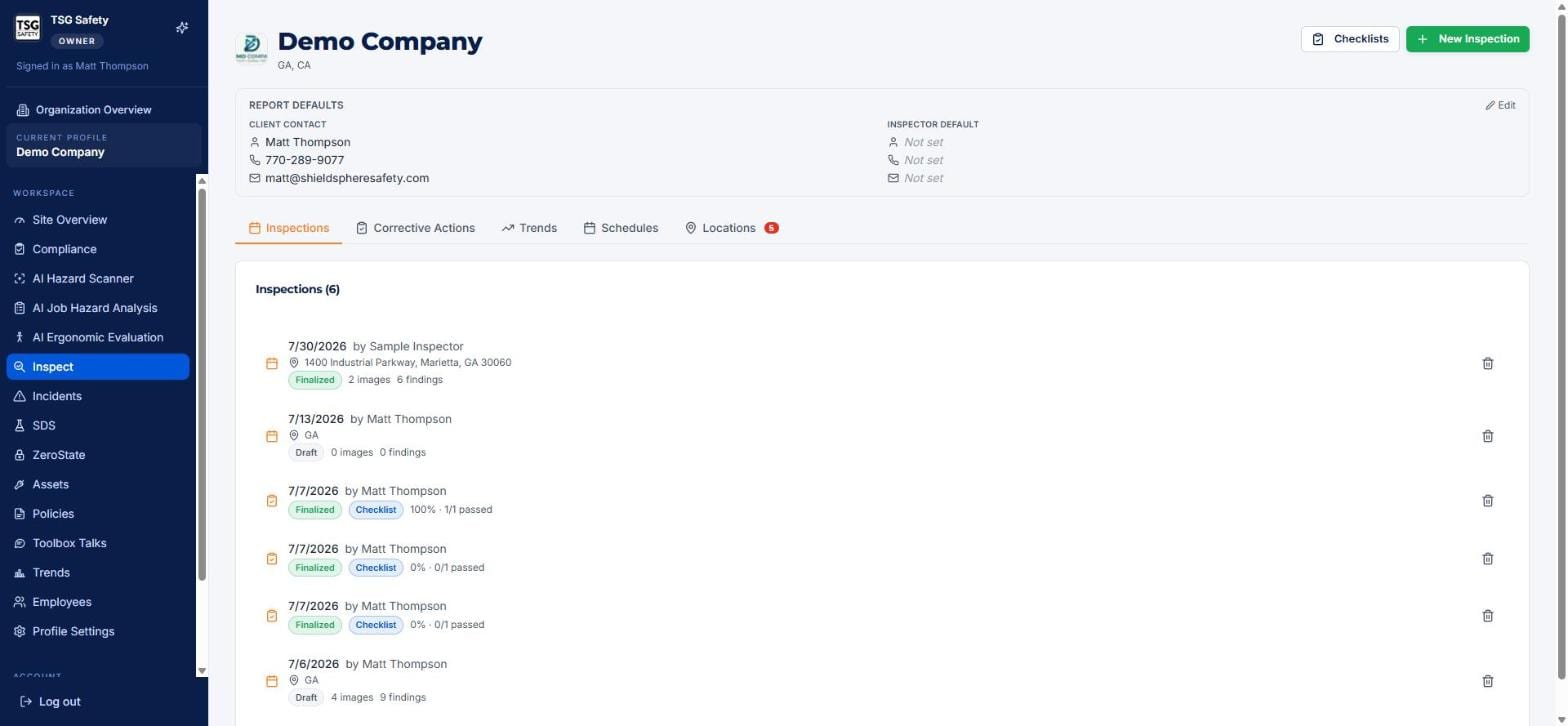
| Inspections | Every inspection at this site, newest first, with its status, image count and finding count. |
| Corrective Actions | The work queue. Counts by status, a completion bar, filters, and every open action. |
| Trends | Charts: hazards over time, severity mix, violation categories, and hazards by location. |
| Schedules | Recurring inspection reminders. Admin setup. |
| Locations | Reusable location labels for tagging photos. Admin setup. The badge shows how many exist. |
In the Inspections tab, a green Finalized badge means the record is locked and complete. An orange Draft badge means someone started it and hasn't finished. A blue Checklist badge marks checklist runs, and shows the pass rate next to it - for example 100% · 1/1 passed.
4Run a photo inspection
You walked the floor and took photos. This turns them into cited findings in about two minutes.
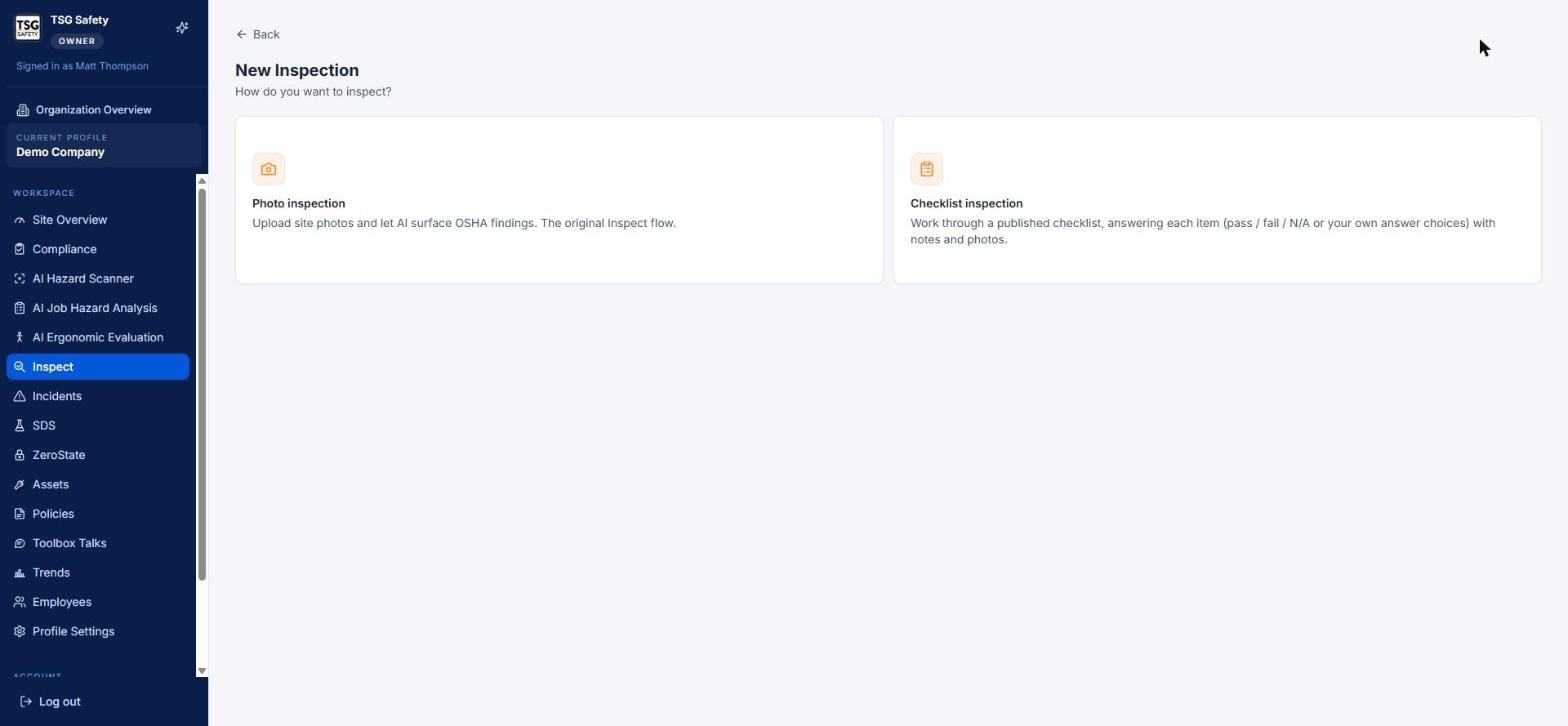
Choose the inspection type
Click New Inspection at the top right, then pick Photo inspection. Choose this when you want the AI to find the hazards for you. Pick Checklist inspection instead when you need to prove that specific questions were asked and answered - see section 6.
Fill in the inspection details
Date defaults to today. State is the only required field - it decides which jurisdiction's standards the AI cites, so get it right. Everything else improves the report but won't block you.
- Inspector name, phone, email - appears on the exported report. If your site has an inspector default set, this pre-fills.
- Street address / city / ZIP - only needed when the inspection happened somewhere other than the site's registered address.
- Site notes - weather, scope, what areas you covered. Worth writing; auditors read it.
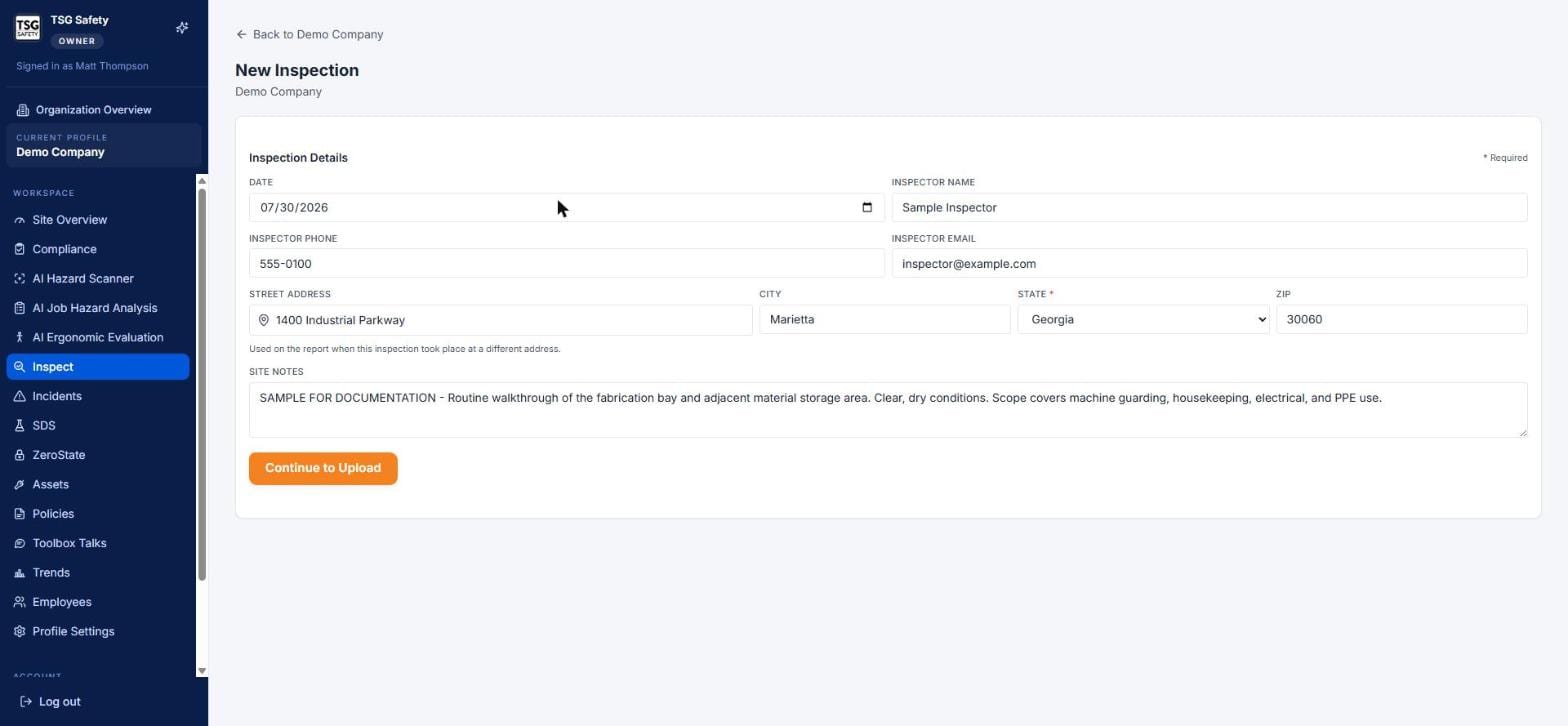
Click Continue to Upload.
Add your images
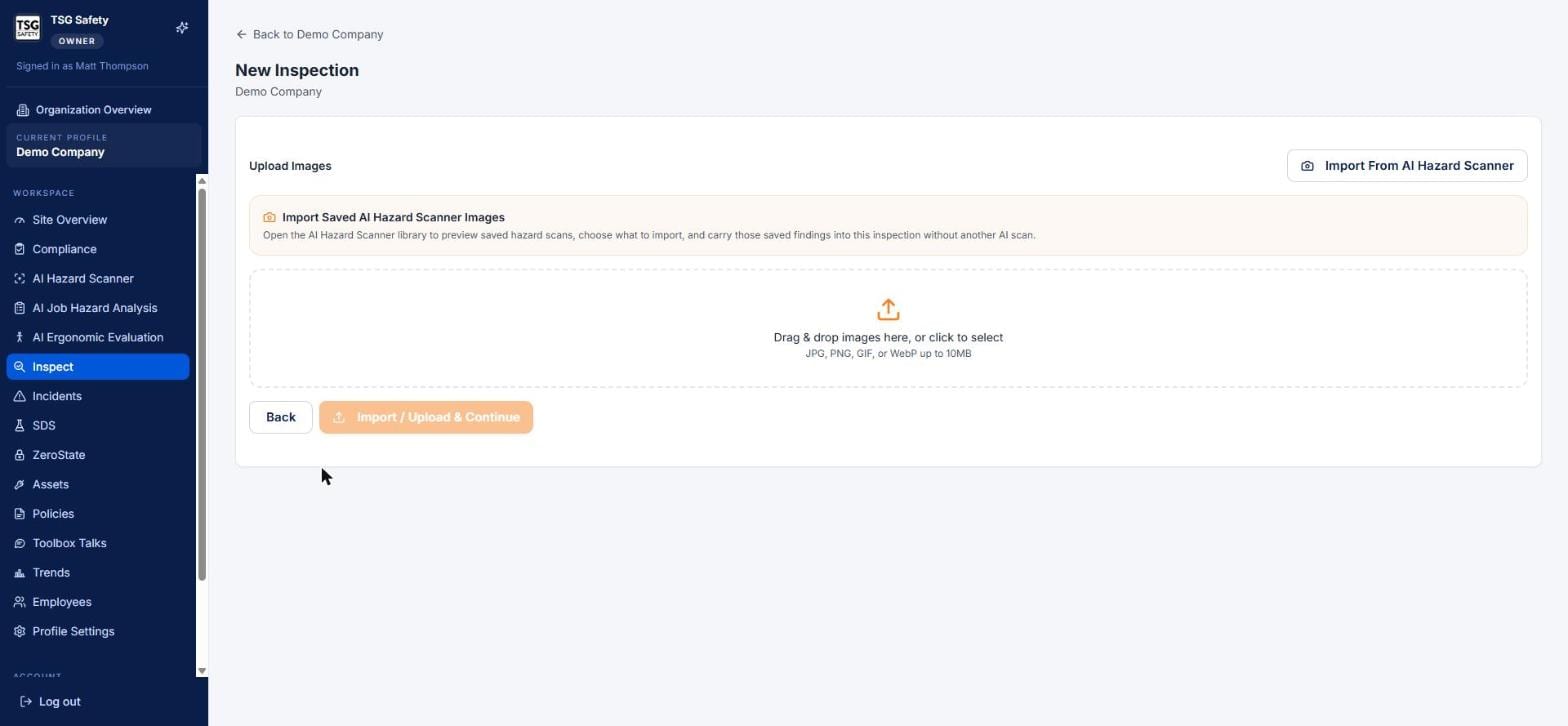
You have two ways to get photos in, and they can be combined in the same inspection:
- Drag and drop (or click to select) - JPG, PNG, GIF or WebP, up to 10 MB each. These get analysed fresh.
- Import From AI Hazard Scanner - pull in photos you already scanned in the Hazard Scanner module, bringing their saved findings with them. No second AI scan, no waiting.
If importing: pick your scans
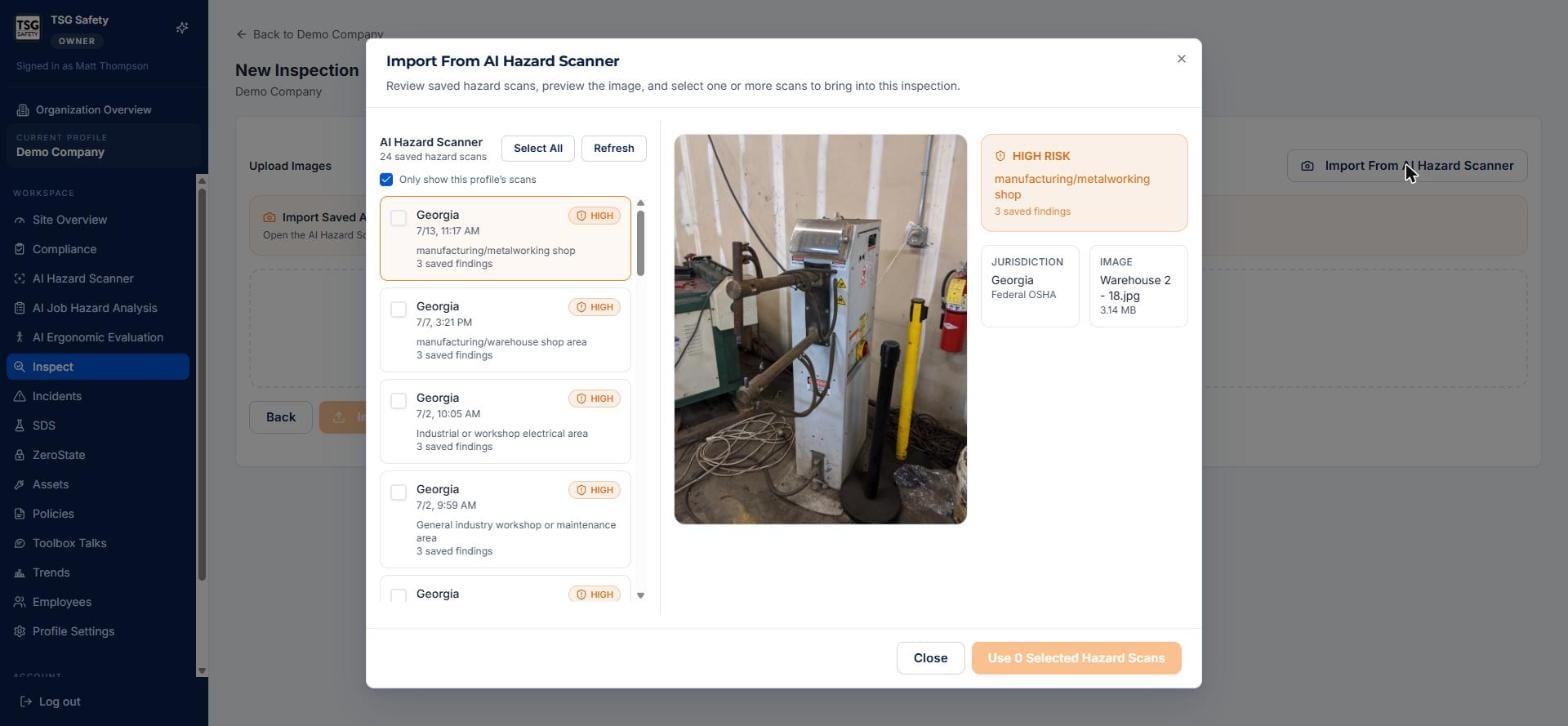
The import window lists every saved hazard scan, newest first, with its risk level and how many findings it carries. Click a row to preview the photo and see its jurisdiction and file details on the right. Tick the checkbox on each scan you want, then click Use n Selected Hazard Scans.
Tag each image with a location
Back on the upload screen, each imported scan gets three optional fields. Filling these in is what makes the Hazards by Location chart useful later, so it's worth the ten seconds.
- Select saved location - pick from your site's location presets. Choosing one auto-fills the report label.
- Location for report - free text if no preset fits.
- Import notes - context for whoever reads the report.
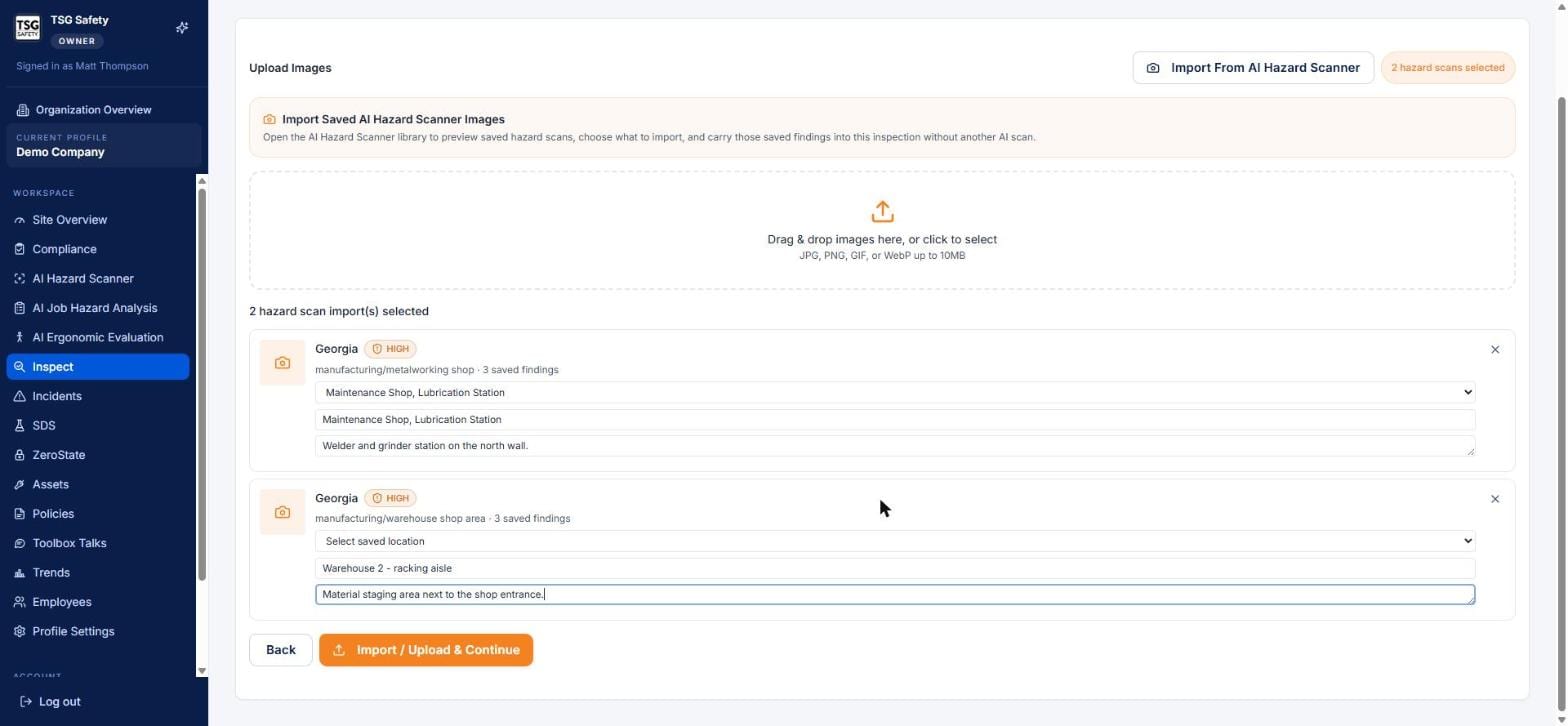
That dropdown is populated by the Locations tab. If it's empty or missing the area you need, see the Admin Guide (Location presets).
Wait for the analysis
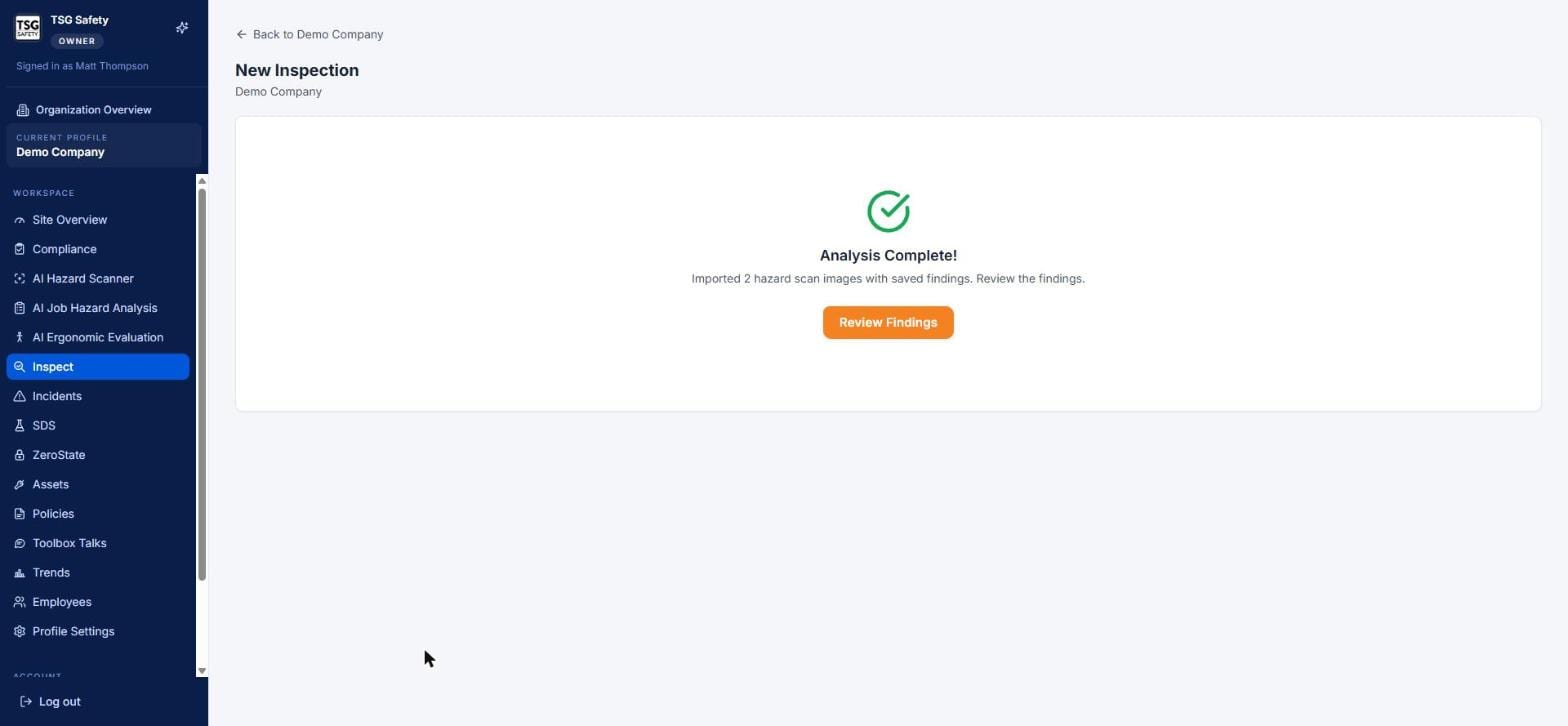
Uploaded photos are analysed now; imported scans carry their existing findings straight through, which is why importing is close to instant. When it's done you'll see a confirmation. Click Review Findings.
5Review and finalize findings
The AI drafts. You decide. Nothing leaves this screen as fact until you finalize it.
The Inspection Review screen
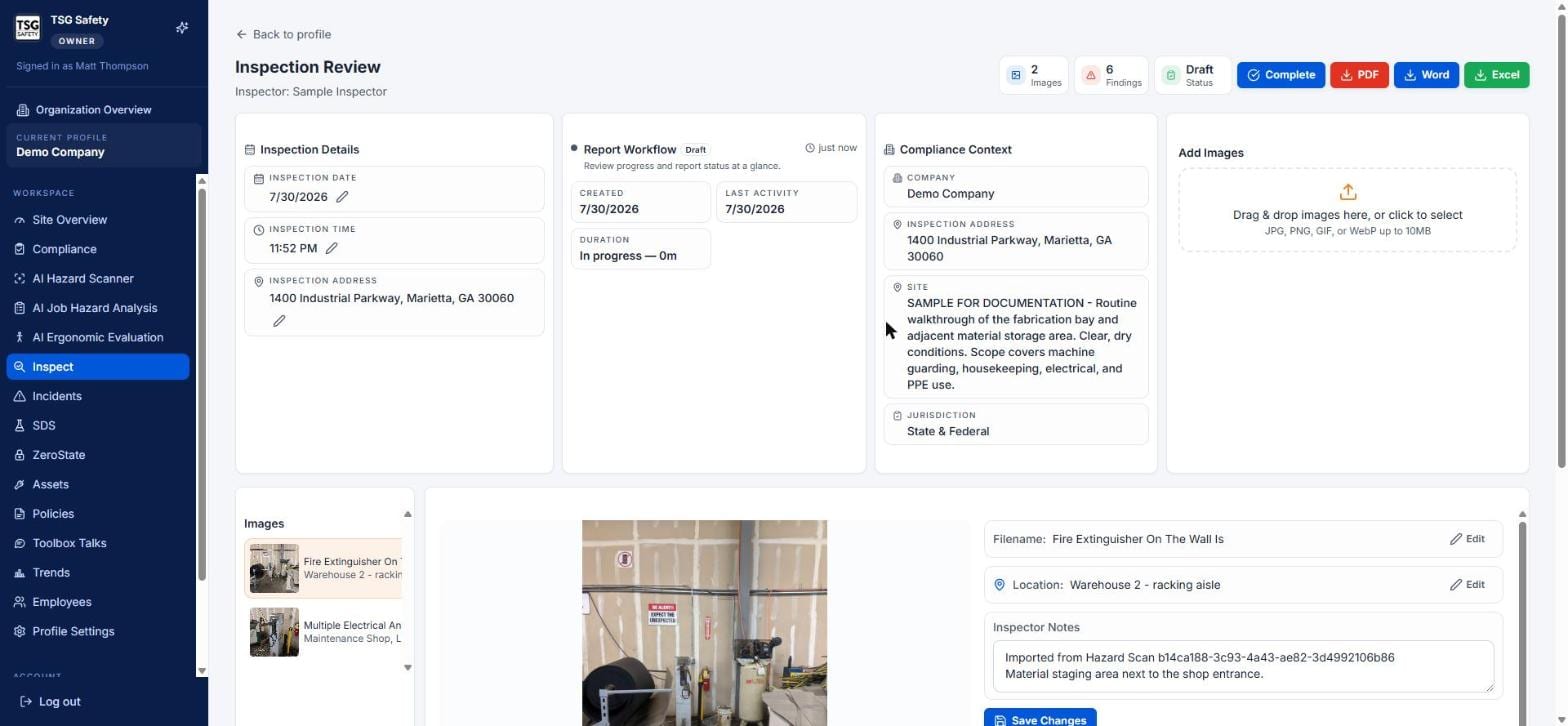
Four panels across the top tell you where things stand:
| Inspection Details | Date, time and address, each editable via the small pencil icon while the inspection is still a draft. |
| Report Workflow | Created date, last activity, and elapsed duration. Useful evidence that the walkthrough was real. |
| Compliance Context | Company, address, your site notes, and the jurisdiction the citations were drawn from. |
| Add Images | Drop more photos in without leaving the review screen. |
Working through the findings
Below the panels, the image strip on the left lets you move between photos. Select one and its findings appear underneath.
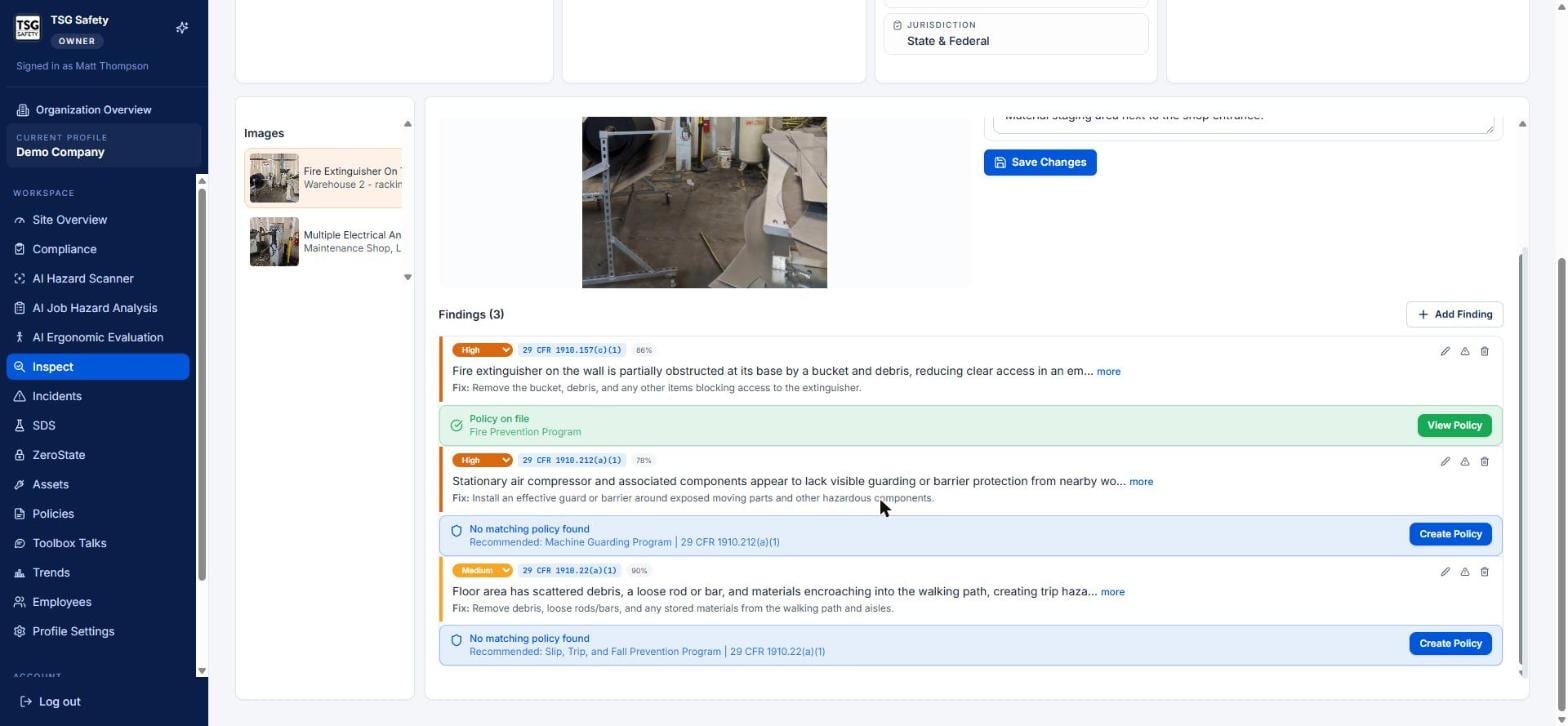
Each finding gives you five things to act on:
- Severity - a dropdown (Critical / High / Medium / Low). Change it if the AI over- or under-called it. This drives the due dates on corrective actions later.
- Citation and confidence - the specific standard, plus how sure the AI is. Treat anything under about 70% as worth a second look.
- Fix - the recommended corrective action. This text becomes the corrective action description, so edit it here if it's not quite right.
- Policy cross-reference - a green Policy on file bar with a View Policy button when you already have a written program covering the standard.
- Policy gap - a blue No matching policy found bar with a Create Policy button when you don't. This is the single most useful thing on the screen: it tells you where a citation would land twice, once for the hazard and once for the missing program.
A No matching policy found bar means an inspector could cite you for the hazard and for not having a written program. Clicking Create Policy takes you straight into generating the recommended program.
Correcting a citation
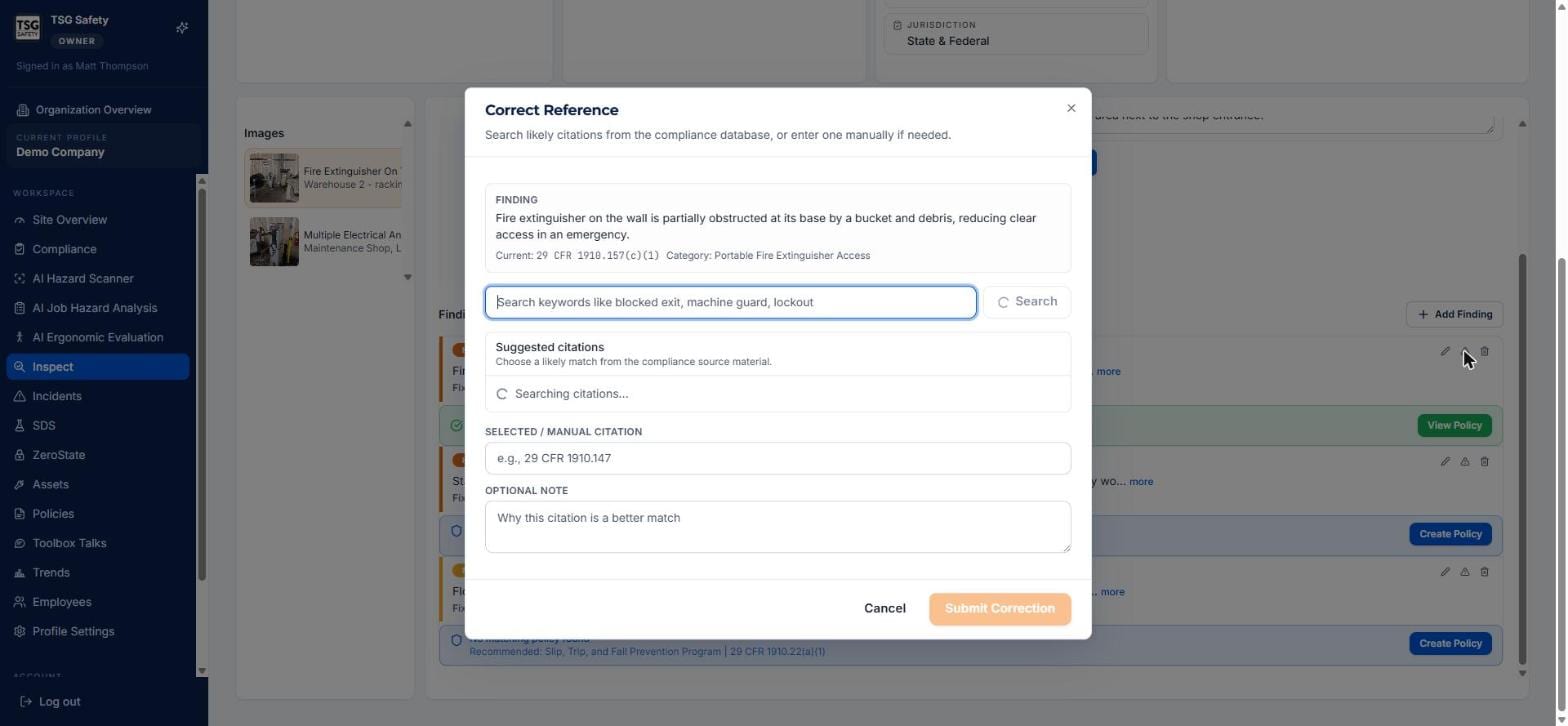
If the AI cited the wrong standard, click the small triangle icon on the finding row. Search the compliance database by keyword, pick a better match or type a citation manually, add a note explaining why, and submit.
Adding a finding the AI missed
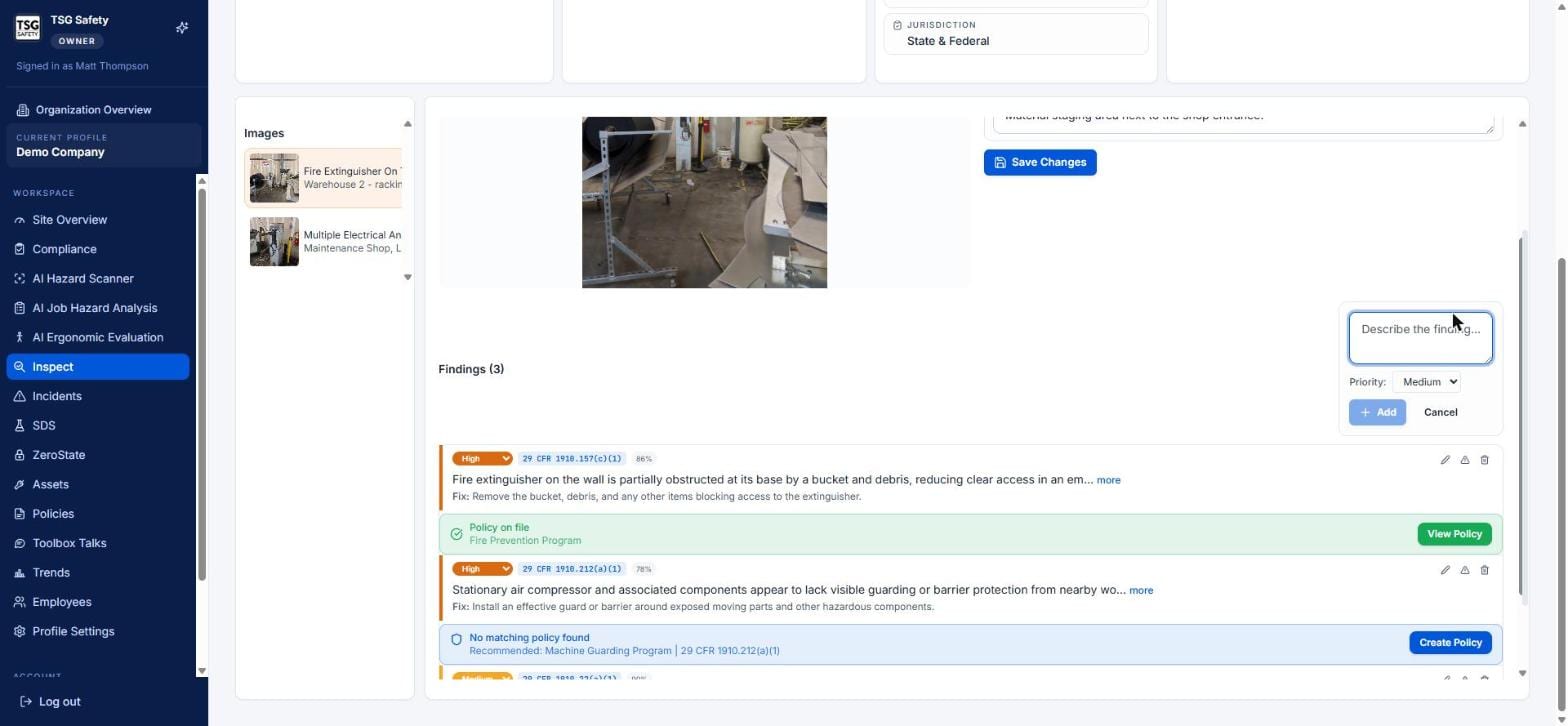
Click + Add Finding, describe what you saw, set a priority, and click Add. Manual findings behave exactly like AI ones from here on - they can be exported and turned into corrective actions.
Every finding row carries a pencil (edit the text inline), a triangle (correct the citation), and a trash can (delete the finding). All three disappear once the inspection is finalized.
Finalizing
When the findings read the way you'd defend them, click Complete at the top right and confirm.
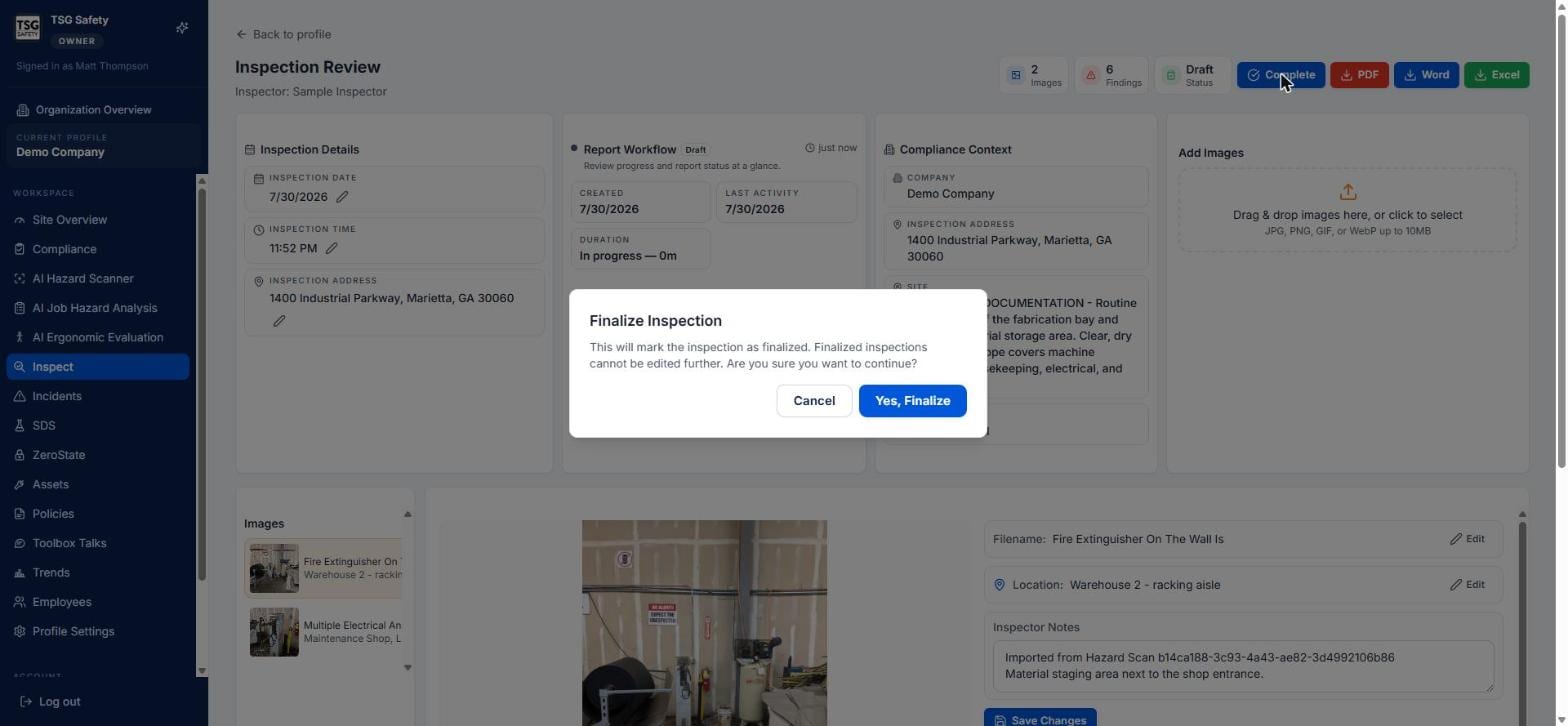
Check that every photo you meant to include is attached, every severity is right, and every citation you doubted has been corrected. There is no unlock.
Raising corrective actions
The moment you finalize, ShieldSphere offers to turn the findings into assigned work. This is the step that makes the inspection worth doing.
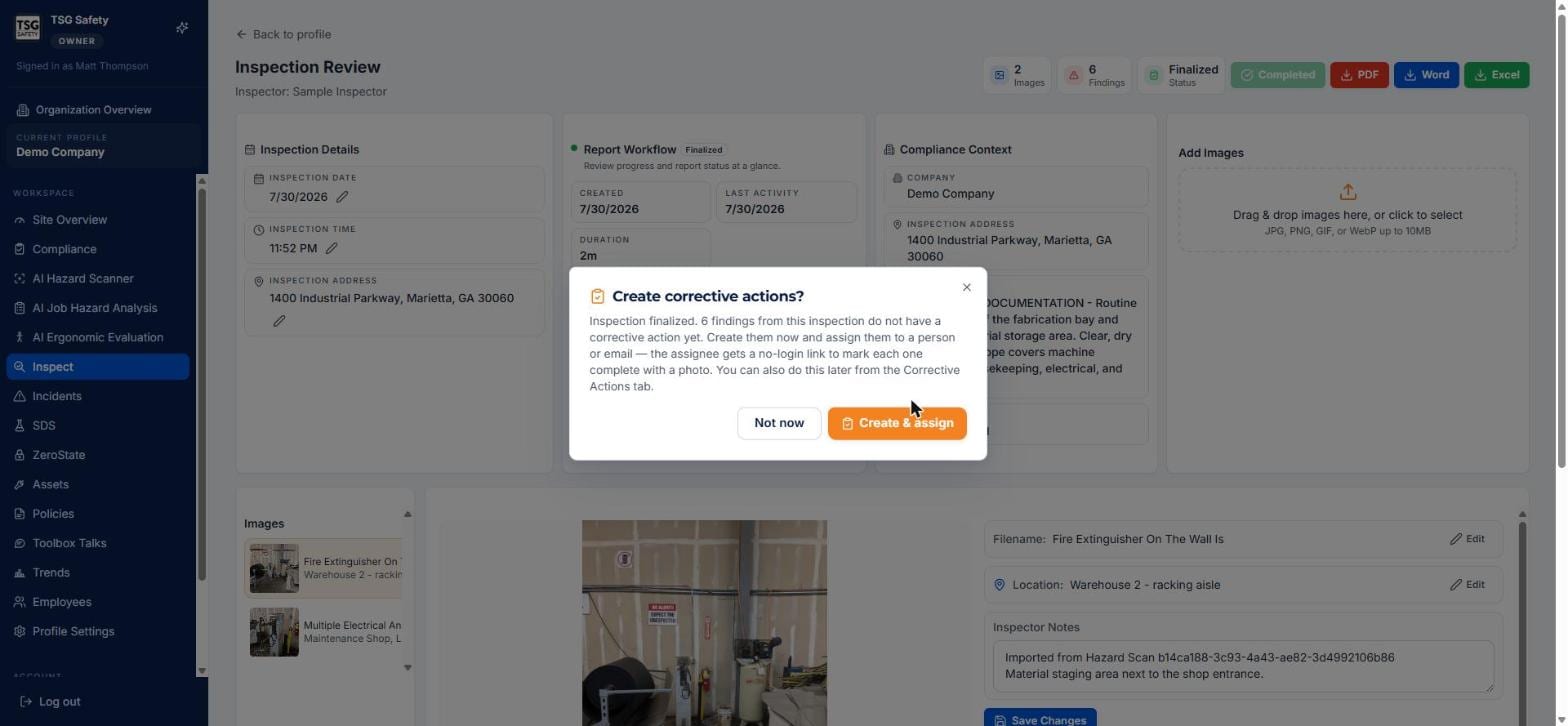
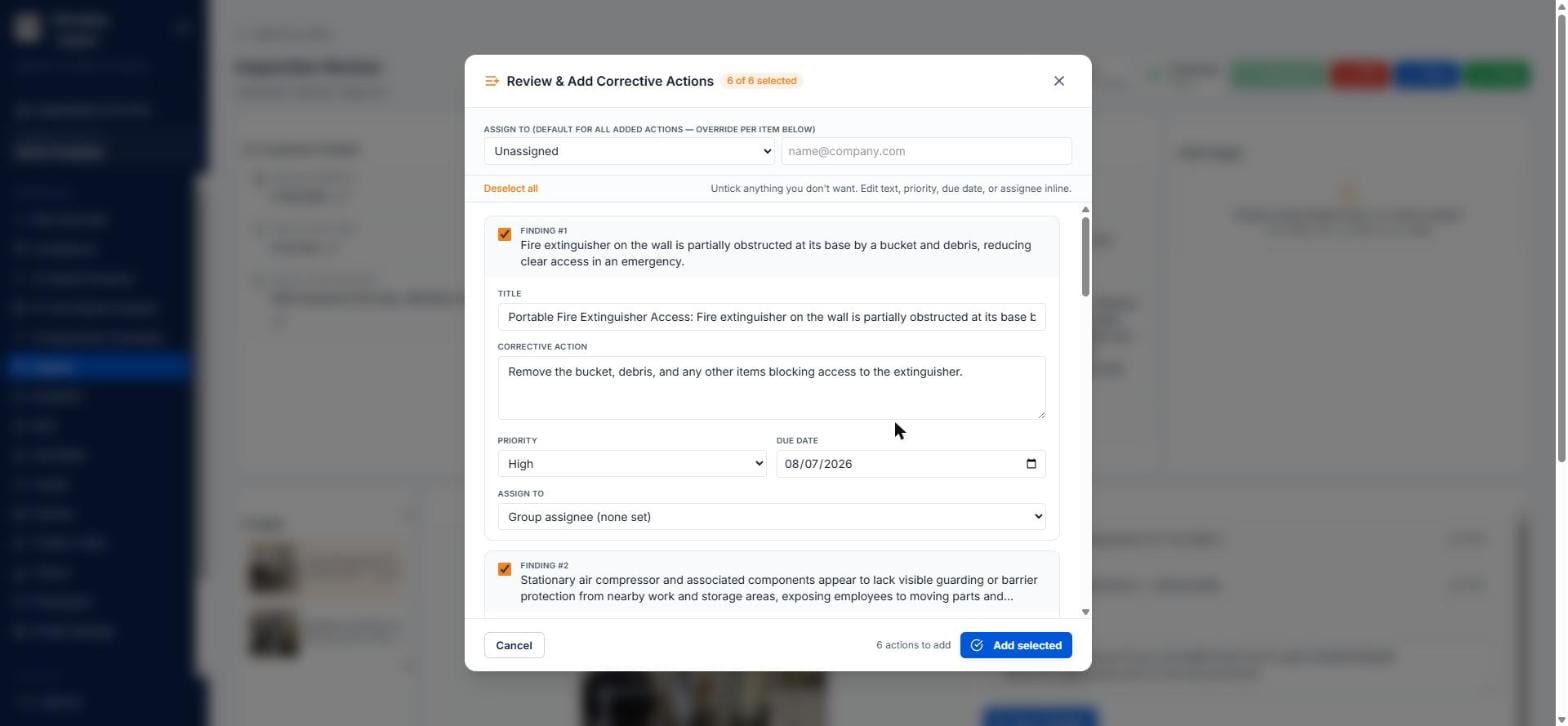
The review window pre-fills a corrective action for every finding: a title built from the violation category, the fix text as the description, a priority carried over from the severity, and a due date derived from that priority. Everything is editable inline.
Click Add selected. You land back on the inspection, now marked Finalized and Completed, and the actions appear in the Corrective Actions tab.
6Run a checklist inspection
Use this when you need to prove specific questions were asked - a monthly fire extinguisher round, a machine guarding audit, a pre-shift check.
Pick a checklist to run
You'll see every published template available to this site. Drafts don't appear here - if the checklist you want is missing, it hasn't been published yet (see the Admin Guide (Build checklist templates)).
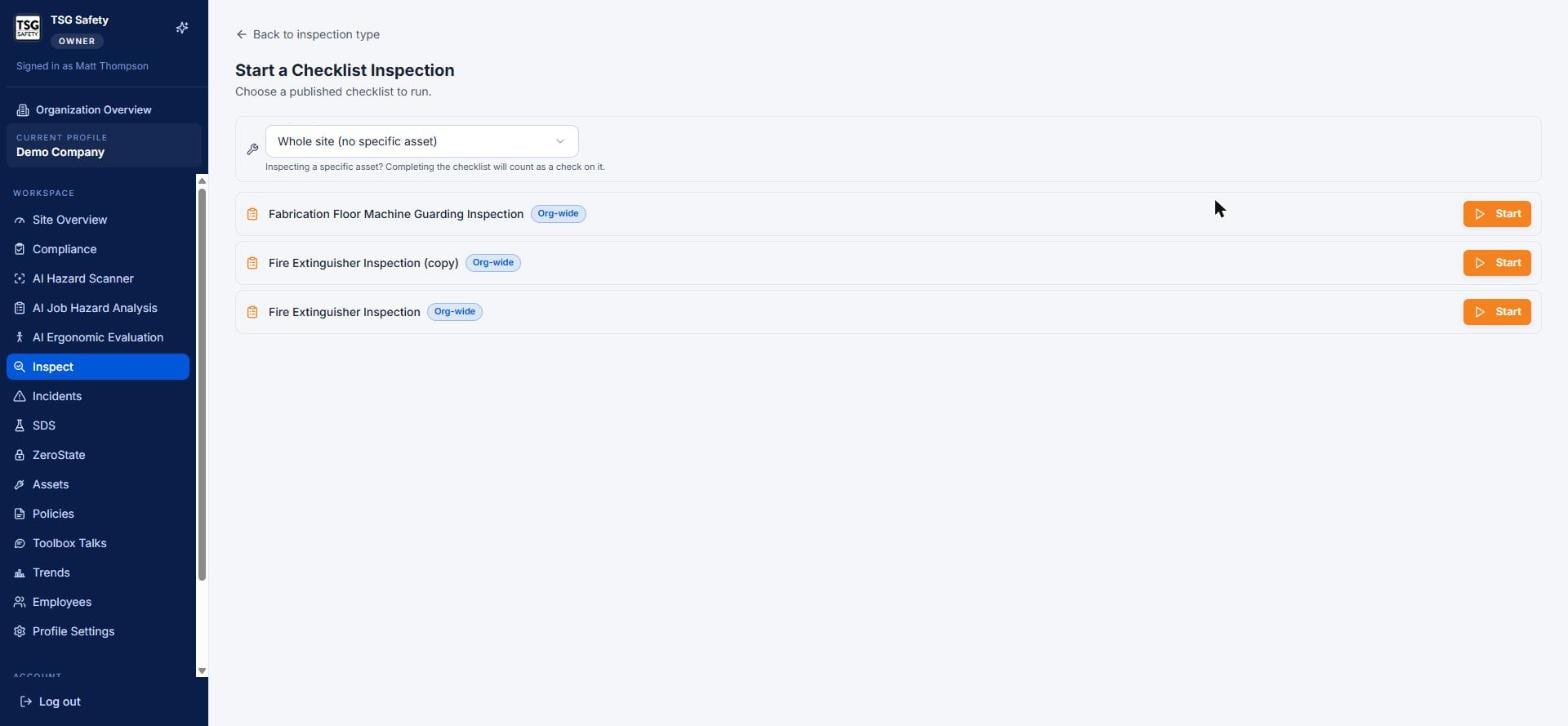
Click Start on the checklist you want.
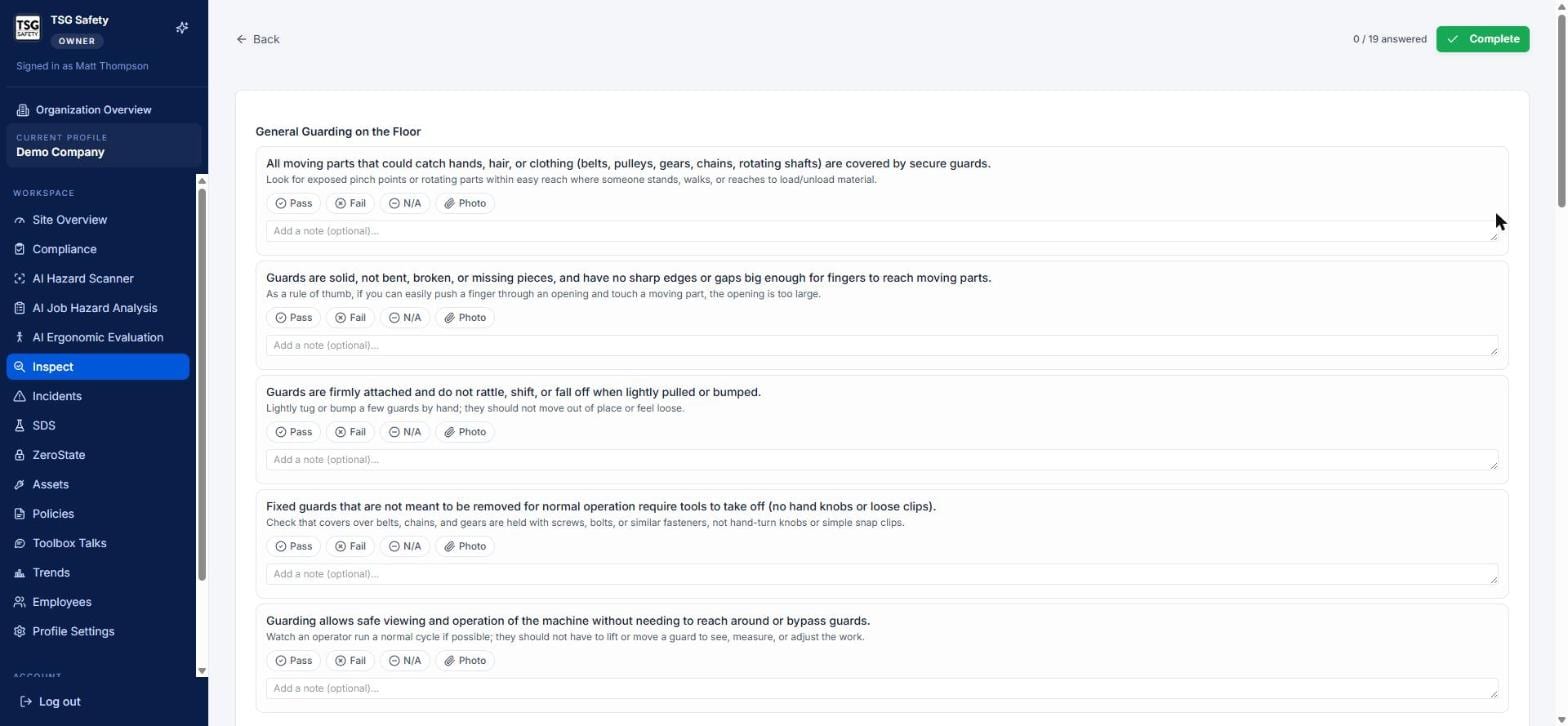
Work down the items
Items are grouped into sections. Each one gives you Pass, Fail, N/A, a Photo button, and a note field. The grey line under each question is guidance from whoever built the template - how to actually check the thing.
Fail an item and say why
Marking an item Fail turns the row red and reveals a Create corrective action button. Write what you saw in the note field first - the AI uses it to draft the corrective action for you.
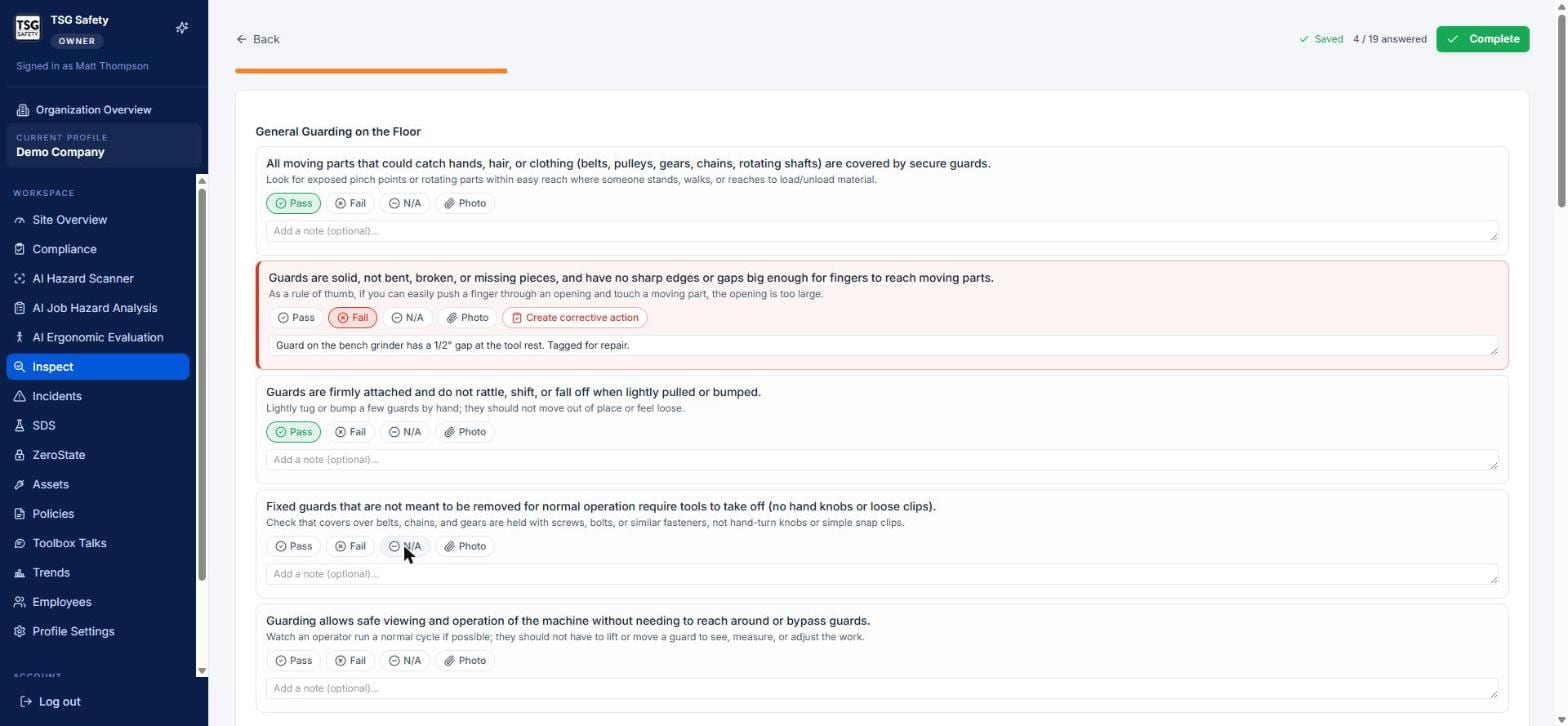
"Fail" on its own tells a future reader nothing. "Guard on the bench grinder has a 1/2" gap at the tool rest" tells them exactly what to fix - and gives the AI enough to write a usable corrective action.
Raise the corrective action
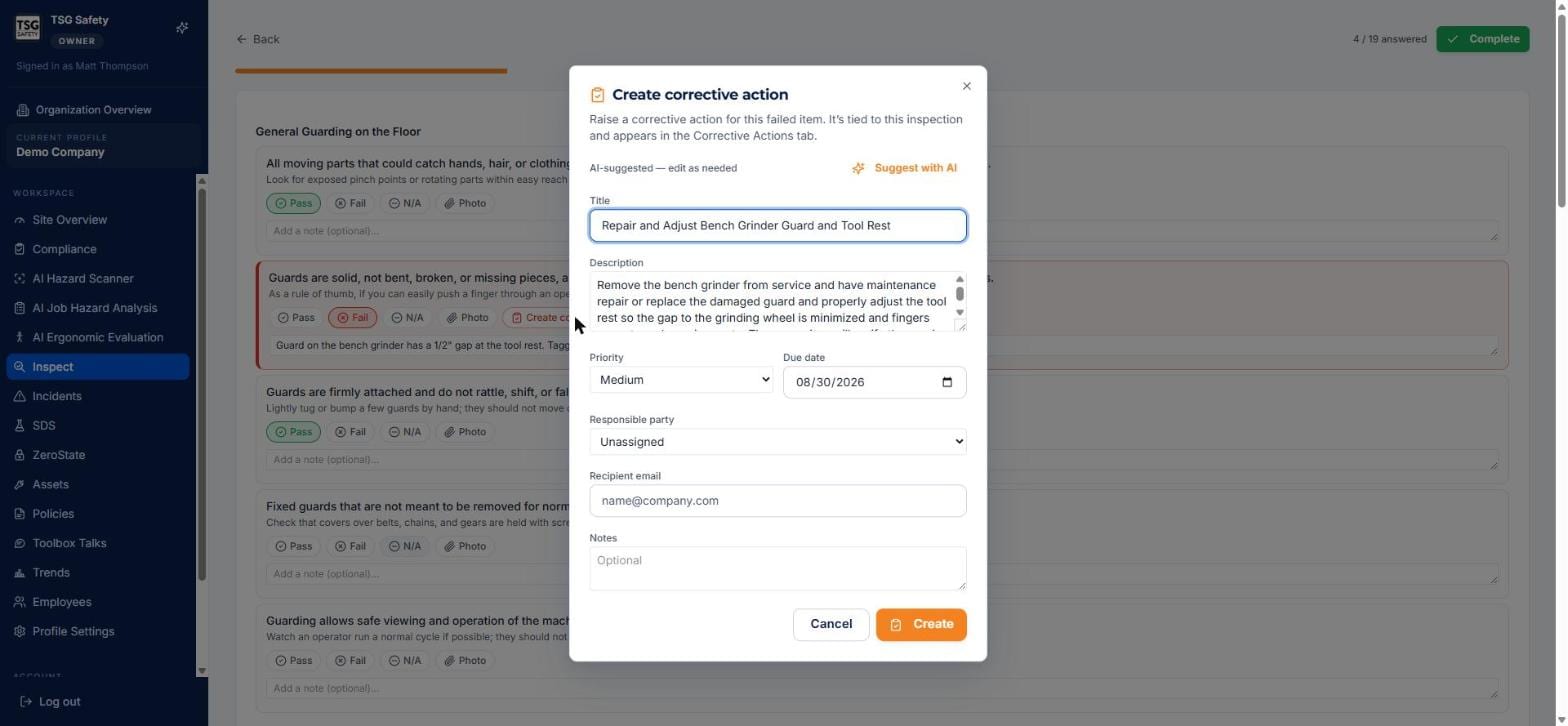
Click Create corrective action. The dialog arrives pre-filled from your note - title, description, priority and due date. Edit anything, assign a responsible party, and add a recipient email if the assignee should be notified. Click Create.
Complete the run
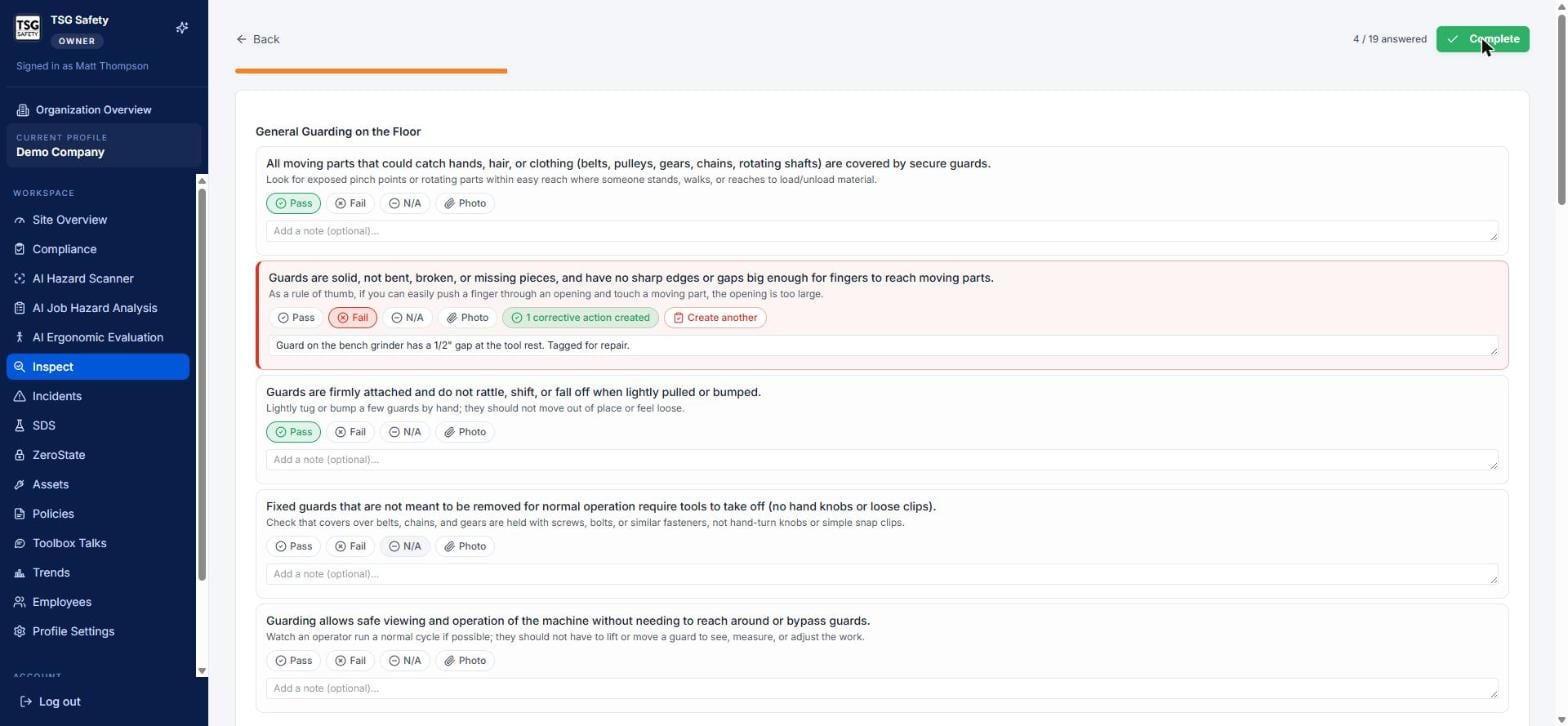
Answer every item, then click Complete at the top right. The finished run appears in the Inspections list with a blue Checklist badge and its pass rate.
If clicking Complete appears to do nothing, check the counter top-right. Every item needs an answer - N/A counts. Scroll for the ones you skipped.
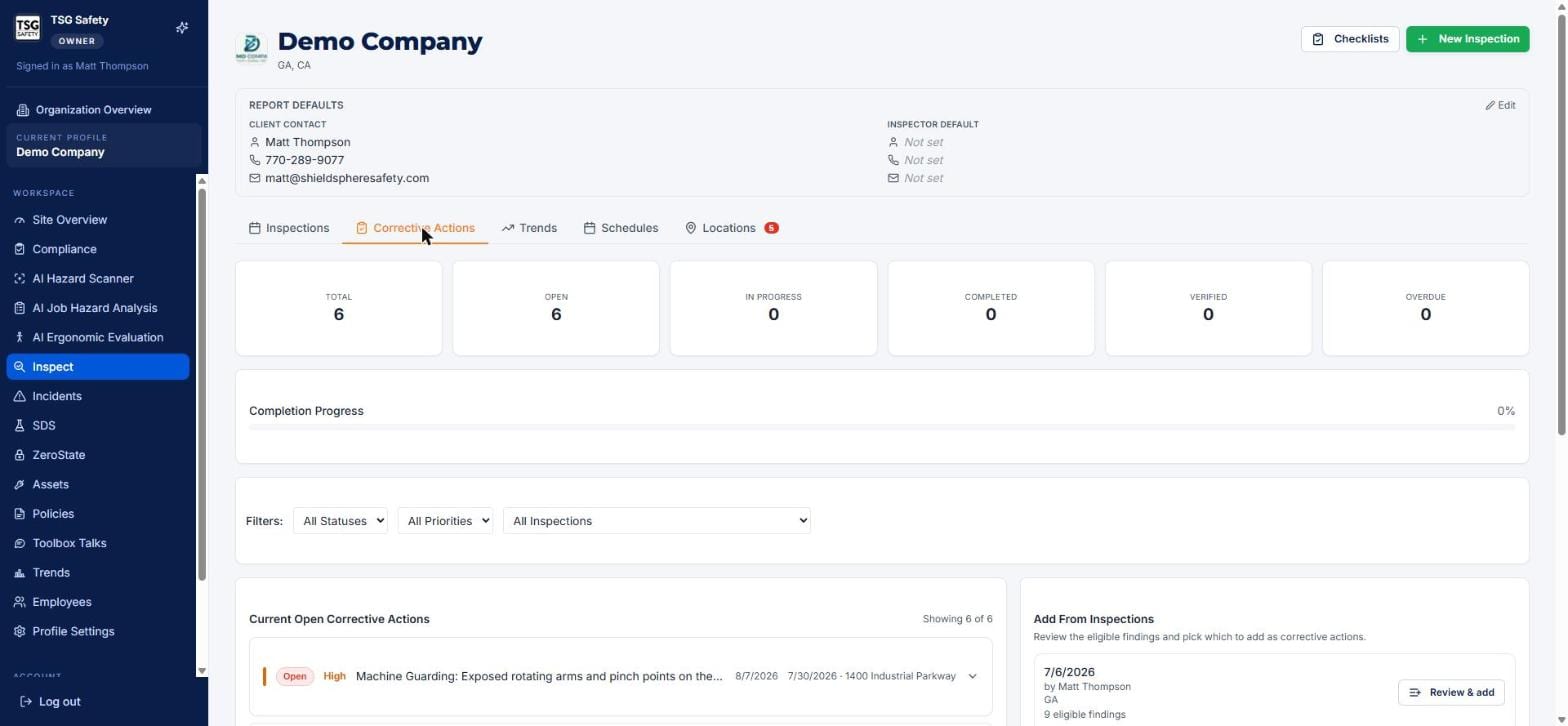
7Work corrective actions to closure
This tab is the actual safety programme. Everything else is paperwork feeding it.
Brief the crew on what you found
Every corrective action carries a Schedule a toolbox talk button, whatever its status. It suggests talks from the ShieldSphere library that match the hazard - and you search if none of them fit - then you pick a date. The talk is adopted for this site and scheduled, keeping a link back to the action that prompted it, so a finding turns into a briefing in a couple of clicks rather than a separate job you have to remember.
The corrective action deals with the guard that was missing on that machine. The talk deals with everyone who walks past a machine like it tomorrow. Doing both is what stops the same finding coming back next quarter.
Finding the right action
Three filters sit above the list: status, priority, and which inspection it came from. Use the last one when you're closing out a single walkthrough.
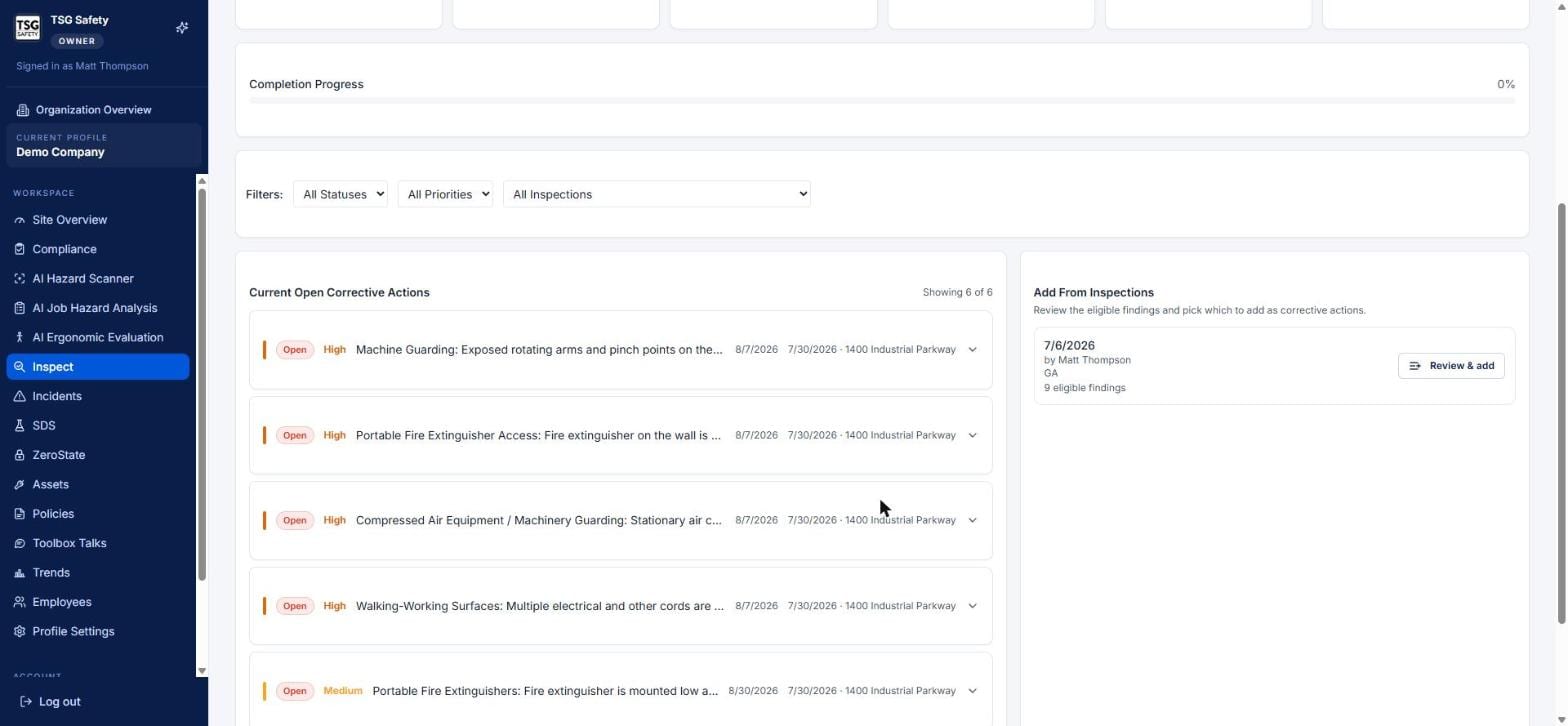
Inside an action
Click the chevron on any row to expand it.
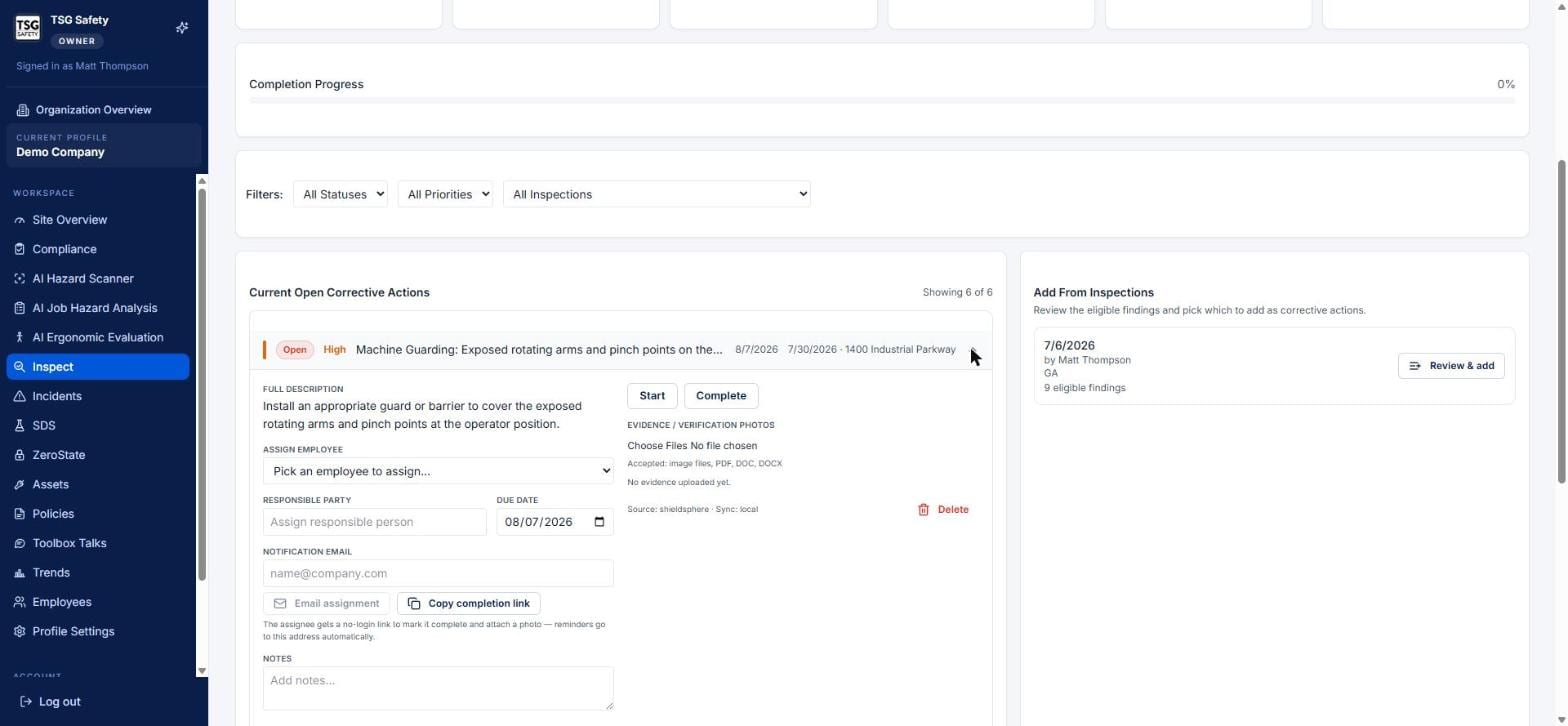
| Control | What it does |
|---|---|
| Assign employee | Pick from the employees on file at this site. |
| Responsible party | Free-text owner - use for contractors or anyone not in Employees. |
| Due date | Drives the Overdue counter. Set from priority by default; change it if the fix genuinely needs longer. |
| Notification email | Where the assignment and reminders go. |
| Email assignment | Sends the assignee a no-login link to mark the action complete and attach a photo. |
| Copy completion link | Same link, copied to your clipboard - paste it into a text, a work order, or a WhatsApp group. |
| Start / Complete | Moves the action through In Progress and Completed. |
| Evidence photos | Attach images, PDF or Word proving the fix. This is what turns a claim into a record. |
The maintenance tech who actually fixes the guard doesn't need a ShieldSphere account. Send the completion link, they tick it done and attach a photo from their phone, and your record closes itself. Reminders go to that address automatically.
Closing the loop
- Assign the action and set a realistic due date.
- Email assignment or Copy completion link to the person doing the work.
- They mark it complete and attach evidence - or you do it on their behalf.
- Verify the fix in person and confirm it, moving the action to Verified.
An action sitting at Completed with no photo and no verification is the weakest link in an otherwise good record. Verified with a photo is what closes an inspector's line of questioning.
8Reading the Trends tab
One inspection tells you what's wrong today. Trends tells you what your programme keeps failing to fix.
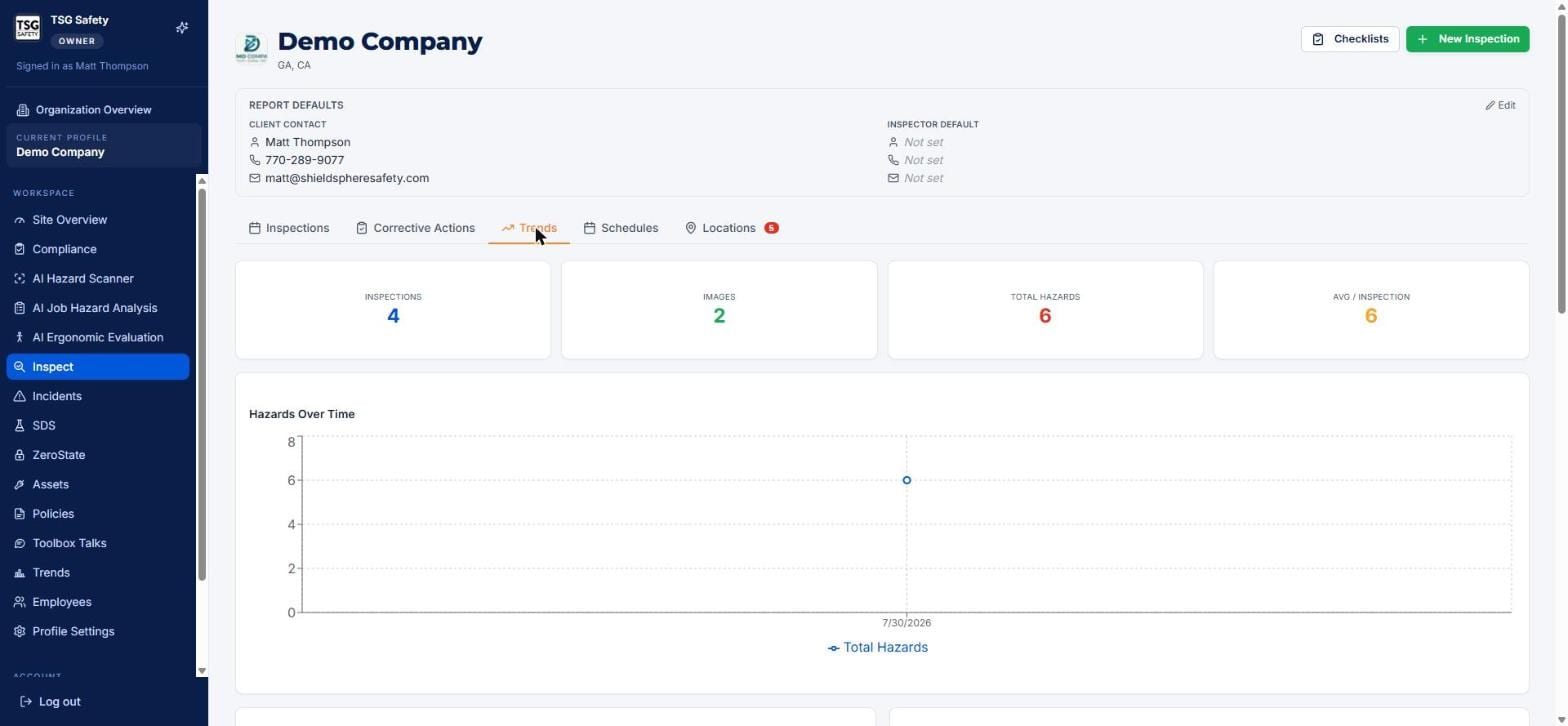
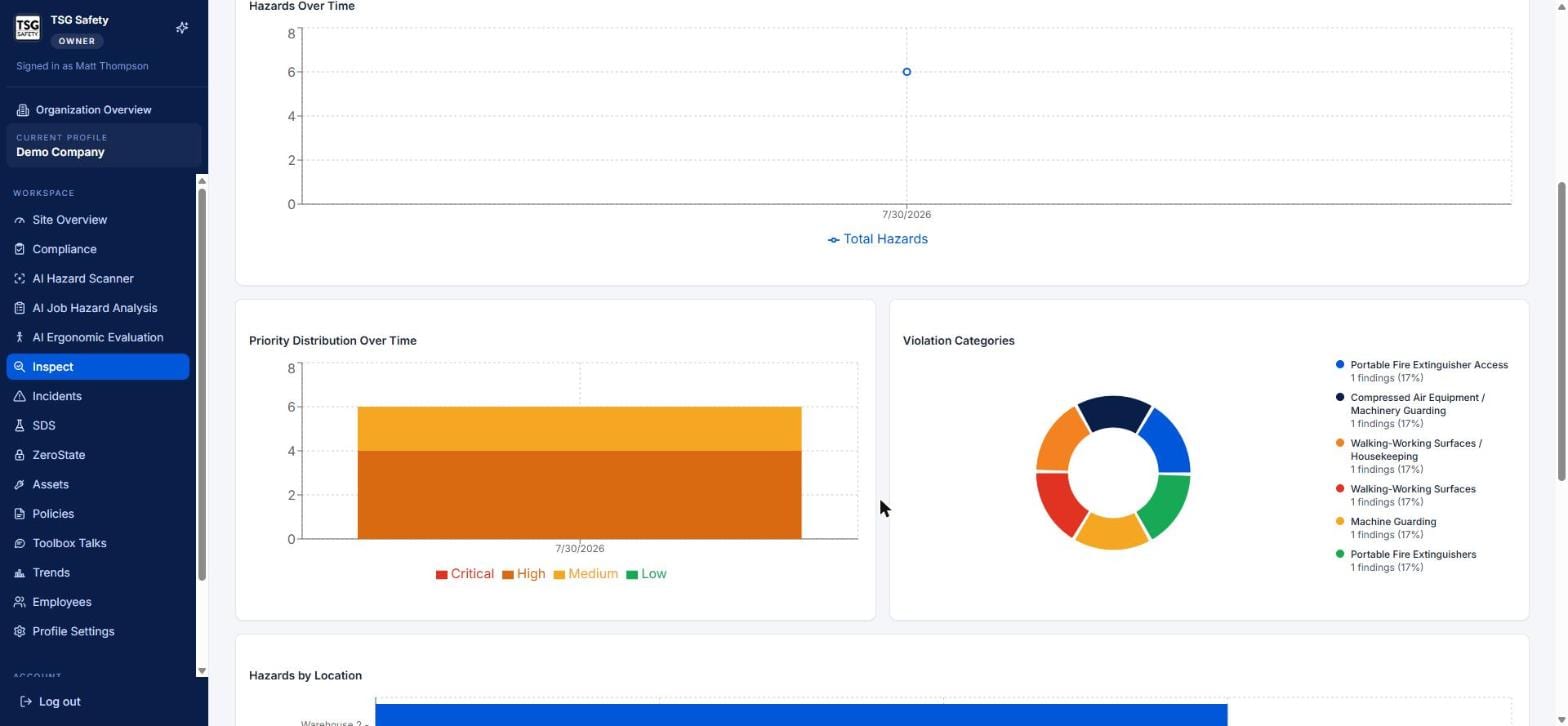
What each chart is actually for
| Hazards Over Time | Is the site getting safer? A flat or rising line after several inspections means fixes aren't sticking. |
| Priority Distribution | Are you clearing the serious ones? Watch the Critical and High bands specifically, not the total. |
| Violation Categories | Where to spend training and capital. One category dominating the donut is your programme's real weak point. |
| Hazards by Location | Which area needs attention. This chart is only as good as your location tagging - see the Admin Guide (Location presets). |
The Trends tab inside Inspect covers inspections at this site only. The Trends item in the left sidebar is a wider view across all your safety data. They are different screens.
9Exporting reports
Three export buttons sit at the top right of any Inspection Review screen:
The client-ready report. Photos, findings, citations and your site notes, formatted for sending or filing.
Word
The same report as an editable .docx, for when you need to add commentary or drop it into a larger document.
Excel
Findings as rows. Use this to merge results across sites or build your own pivot.
Exports work on drafts as well as finalized inspections, but only a finalized inspection is a defensible record - export the draft for internal review, not for the client.
10Troubleshooting
| Symptom | Cause and fix |
|---|---|
| My checklist isn't in the list | It's still a draft. Publish it (see the Admin Guide, Build checklist templates), or check its availability isn't set to a different site. |
| Complete does nothing on a checklist | Unanswered items. Check the counter top-right; every item needs Pass, Fail or N/A. |
| I need to edit a finalized inspection | You can't. Run a new inspection referencing the original in its site notes. |
| I need to change a published checklist | Duplicate it, edit the copy, publish that, then archive the original. |
| The location dropdown is empty | No presets exist for this site yet. Add them in the Locations tab - an admin setting (see the Admin Guide, Location presets). |
| Hazards by Location chart is useless | Photos weren't tagged with locations at import. Tag them going forward (section 4, step 5). |
| Nobody's getting schedule reminders | Reminders go only to users with inspection reminders enabled on their own account. |
| The AI cited the wrong standard | Use the triangle icon on the finding to correct the reference before finalizing (section 5). |
| Corrective actions show as Overdue | The due date has passed. Either the work is late, or the date was unrealistic - edit it and note why. |
| Assignee has no ShieldSphere account | Use Copy completion link or Email assignment - the link needs no login. |
Try Inspect in ShieldSphere
Start a free hazard scan and see the platform these guides describe - no credit card required.
Screens captured from the live application in July 2026 using a demonstration site - your screens will show your own data. Because ShieldSphere ships changes regularly, check the version above against the current release before circulating this guide widely. Questions? Contact support.